
Studio Set - Truman Balcony
Page 1 of 4
The Exterior of the Oval Office Set was turned into the Truman Balcony of the White House. Lots of research on the trims was done; due to material limitations and time restraints some slight changes were made.
The Green Screen on the top of the columns as well as the far facade of the White House make this simple set come to life.

Studio Set - Truman Balcony
Page 2 of 4
The Exterior of the Oval Office Set was turned into the Truman Balcony of the White House. Lots of research on the trims was done; due to material limitations and time restraints some slight changes were made.
The Green Screen on the top of the columns as well as the far facade of the White House make this simple set come to life.

Studio Set - Truman Balcony
Page 3 of 4
The Exterior of the Oval Office Set was turned into the Truman Balcony of the White House. Lots of research on the trims was done; due to material limitations and time restraints some slight changes were made.
The Green Screen on the top of the columns as well as the far facade of the White House make this simple set come to life.

Studio Set - Truman Balcony
Page 4 of 4
The Exterior of the Oval Office Set was turned into the Truman Balcony of the White House. Lots of research on the trims was done; due to material limitations and time restraints some slight changes were made.
The Green Screen on the top of the columns as well as the far facade of the White House make this simple set come to life.

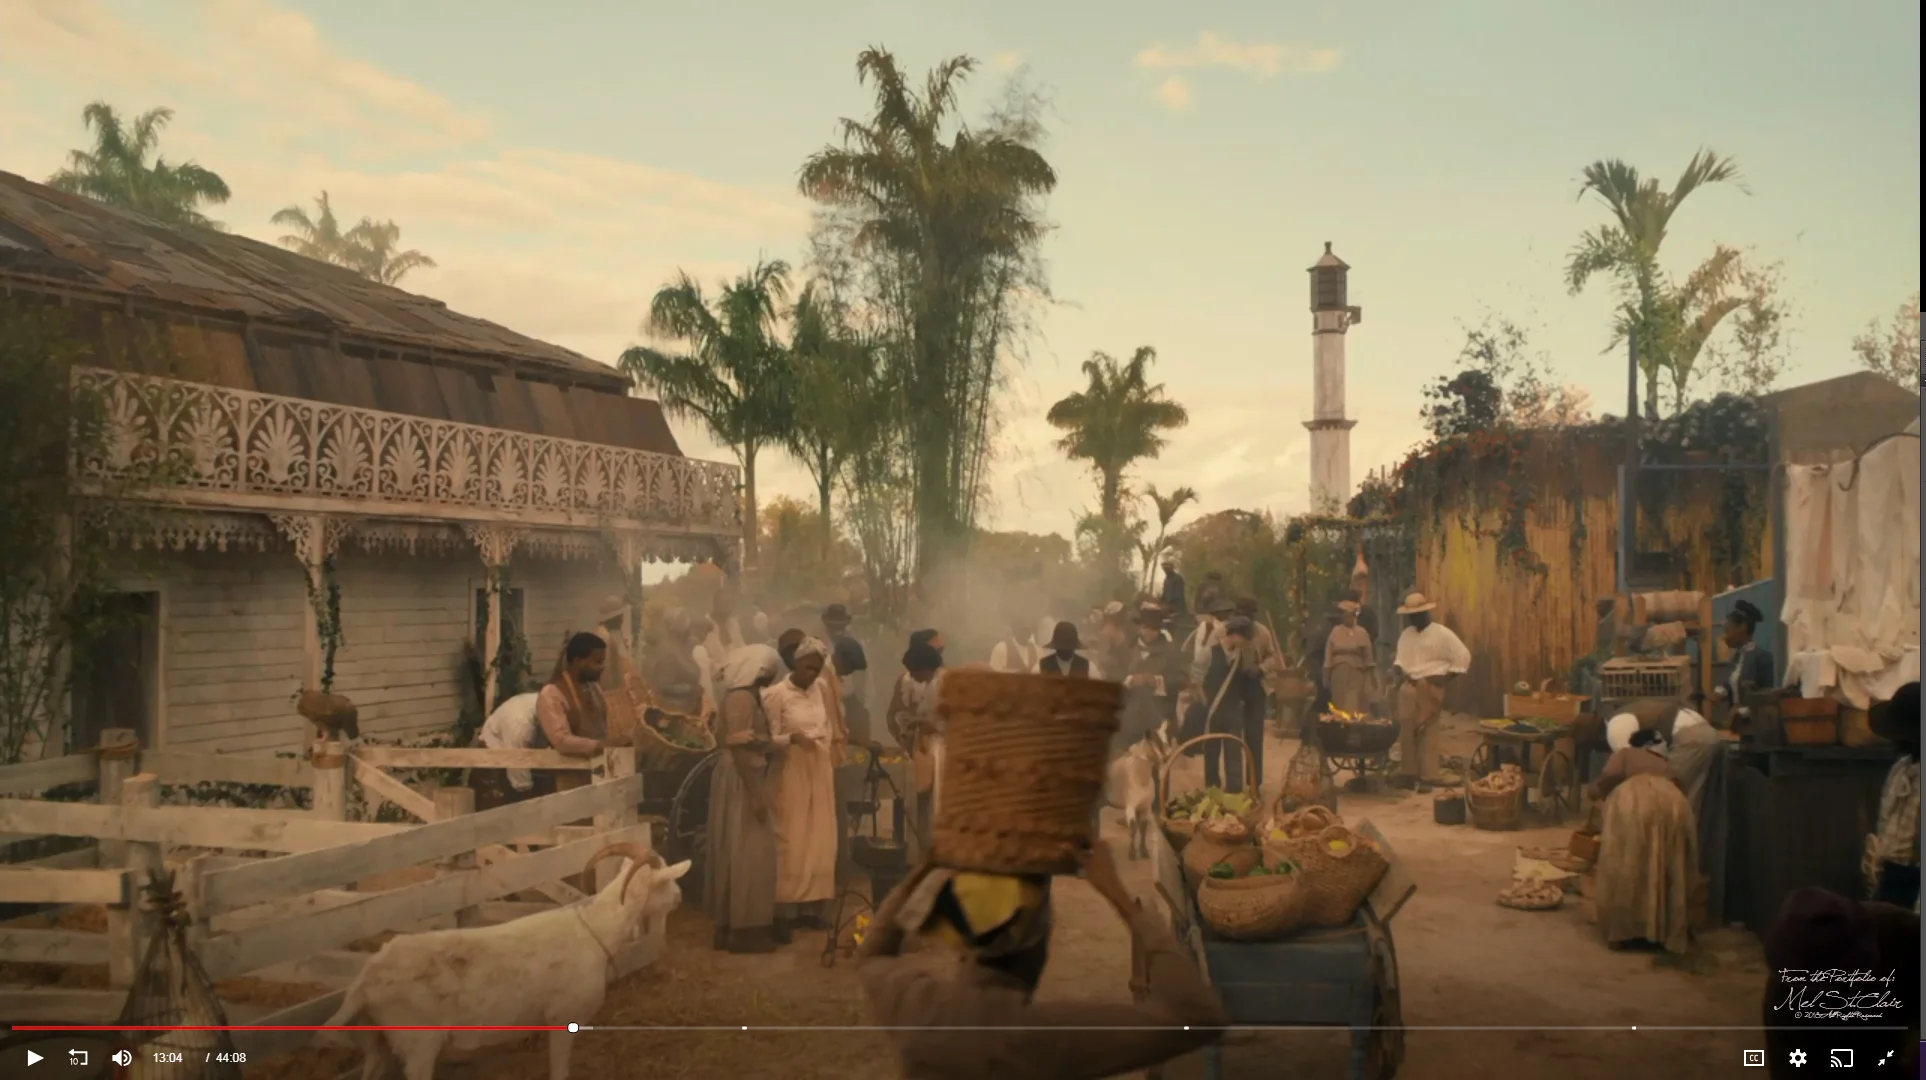
Location Build - Port of Spain
1 of 11
Based on 2 grainy photos of the full building from the early 1900’s, and existing photos of the current roundabout that circles the remaining lighthouse, the facade in Port of Spain, Trinidad was replicated.
Plans, Sections, Elevations, Details & Custom CNC Pattern Rafters were all designed from a SketchUp model given to Mel by the Production Designer.

Location Build - Port of Spain
2 of 11
Based on 2 grainy photos of the full building from the early 1900’s, and existing photos of the current roundabout that circles the remaining lighthouse, the facade in Port of Spain, Trinidad was replicated.
Plans, Sections, Elevations, Details & Custom CNC Pattern Rafters were all designed from a SketchUp model given to Mel by the Production Designer.

Location Build - Port of Spain
3 of 11
Based on 2 grainy photos of the full building from the early 1900’s, and existing photos of the current roundabout that circles the remaining lighthouse, the facade in Port of Spain, Trinidad was replicated.
Plans, Sections, Elevations, Details & Custom CNC Pattern Rafters were all designed from a SketchUp model given to Mel by the Production Designer.

Location Build - Port of Spain
4 of 11
Based on 2 grainy photos of the full building from the early 1900’s, and existing photos of the current roundabout that circles the remaining lighthouse, the facade in Port of Spain, Trinidad was replicated.
Plans, Sections, Elevations, Details & Custom CNC Pattern Rafters were all designed from a SketchUp model given to Mel by the Production Designer.

Location Build - Port of Spain
5 of 11
Based on 2 grainy photos of the full building from the early 1900’s, and existing photos of the current roundabout that circles the remaining lighthouse, the facade in Port of Spain, Trinidad was replicated.
Plans, Sections, Elevations, Details & Custom CNC Pattern Rafters were all designed from a SketchUp model given to Mel by the Production Designer.

Location Build - Port of Spain
6 of 11
Based on 2 grainy photos of the full building from the early 1900’s, and existing photos of the current roundabout that circles the remaining lighthouse, the facade in Port of Spain, Trinidad was replicated.
Plans, Sections, Elevations, Details & Custom CNC Pattern Rafters were all designed from a SketchUp model given to Mel by the Production Designer.

Location Build - Port of Spain
7 of 11
Based on 2 grainy photos of the full building from the early 1900’s, and existing photos of the current roundabout that circles the remaining lighthouse, the facade in Port of Spain, Trinidad was replicated.
Plans, Sections, Elevations, Details & Custom CNC Pattern Rafters were all designed from a SketchUp model given to Mel by the Production Designer.

Location Build - Port of Spain
8 of 11
Based on 2 grainy photos of the full building from the early 1900’s, and existing photos of the current roundabout that circles the remaining lighthouse, the facade in Port of Spain, Trinidad was replicated.
Plans, Sections, Elevations, Details & Custom CNC Pattern Rafters were all designed from a SketchUp model given to Mel by the Production Designer.

Location Build - Port of Spain
9 of 11
Based on 2 grainy photos of the full building from the early 1900’s, and existing photos of the current roundabout that circles the remaining lighthouse, the facade in Port of Spain, Trinidad was replicated.
Plans, Sections, Elevations, Details & Custom CNC Pattern Rafters were all designed from a SketchUp model given to Mel by the Production Designer.

Location Build - Port of Spain
10 of 11
Based on 2 grainy photos of the full building from the early 1900’s, and existing photos of the current roundabout that circles the remaining lighthouse, the facade in Port of Spain, Trinidad was replicated.
Plans, Sections, Elevations, Details & Custom CNC Pattern Rafters were all designed from a SketchUp model given to Mel by the Production Designer.

Location Build - Port of Spain
11 of 11
Based on 2 grainy photos of the full building from the early 1900’s, and existing photos of the current roundabout that circles the remaining lighthouse, the facade in Port of Spain, Trinidad was replicated.
Plans, Sections, Elevations, Details & Custom CNC Pattern Rafters were all designed from a SketchUp model given to Mel by the Production Designer.

Location & Studio Builds - Mine Shaft
Page 1 of 8
This was a 2-Part build; the main set was a location where most of the filming took place with one scene being built outside the stage where we could get a reverse of the mine shaft from the bottom to the top.
Research was done and presented to the Production Designer and a 3D Model was designed and sent out to get rendered by a concept artist before the official approval was given.
Once that was granted the 2 pieces of the set were designed and built to look the same for continuity between shots.

Location & Studio Builds - Mine Shaft
Page 2 of 8
This was a 2-Part build; the main set was a location where most of the filming took place with one scene being built outside the stage where we could get a reverse of the mine shaft from the bottom to the top.
Research was done and presented to the Production Designer and a 3D Model was designed and sent out to get rendered by a concept artist before the official approval was given.
Once that was granted the 2 pieces of the set were designed and built to look the same for continuity between shots.

Location & Studio Builds - Mine Shaft
Page 3 of 8
This was a 2-Part build; the main set was a location where most of the filming took place with one scene being built outside the stage where we could get a reverse of the mine shaft from the bottom to the top.
Research was done and presented to the Production Designer and a 3D Model was designed and sent out to get rendered by a concept artist before the official approval was given.
Once that was granted the 2 pieces of the set were designed and built to look the same for continuity between shots.

Location & Studio Builds - Mine Shaft
Page 4 of 8
This was a 2-Part build; the main set was a location where most of the filming took place with one scene being built outside the stage where we could get a reverse of the mine shaft from the bottom to the top.
Research was done and presented to the Production Designer and a 3D Model was designed and sent out to get rendered by a concept artist before the official approval was given.
Once that was granted the 2 pieces of the set were designed and built to look the same for continuity between shots.

Location & Studio Builds - Mine Shaft
Page 5 of 8
This was a 2-Part build; the main set was a location where most of the filming took place with one scene being built outside the stage where we could get a reverse of the mine shaft from the bottom to the top.
Research was done and presented to the Production Designer and a 3D Model was designed and sent out to get rendered by a concept artist before the official approval was given.
Once that was granted the 2 pieces of the set were designed and built to look the same for continuity between shots.

Location & Studio Builds - Mine Shaft
Page 6 of 8
This was a 2-Part build; the main set was a location where most of the filming took place with one scene being built outside the stage where we could get a reverse of the mine shaft from the bottom to the top.
Research was done and presented to the Production Designer and a 3D Model was designed and sent out to get rendered by a concept artist before the official approval was given.
Once that was granted the 2 pieces of the set were designed and built to look the same for continuity between shots.

Location & Studio Builds - Mine Shaft
Page 7 of 8
This was a 2-Part build; the main set was a location where most of the filming took place with one scene being built outside the stage where we could get a reverse of the mine shaft from the bottom to the top.
Research was done and presented to the Production Designer and a 3D Model was designed and sent out to get rendered by a concept artist before the official approval was given.
Once that was granted the 2 pieces of the set were designed and built to look the same for continuity between shots.

Location & Studio Builds - Mine Shaft
Page 8 of 8
This was a 2-Part build; the main set was a location where most of the filming took place with one scene being built outside the stage where we could get a reverse of the mine shaft from the bottom to the top.
Research was done and presented to the Production Designer and a 3D Model was designed and sent out to get rendered by a concept artist before the official approval was given.
Once that was granted the 2 pieces of the set were designed and built to look the same for continuity between shots.

Location - Apartment
Page 1 of 5
Working at the direction of the Production Designer and Art Director; Mel was able to make this already small apartment into an ever smaller cramped space, as scripted.
The interior hallway was to be Doubled as an Exterior Apartment Corridor with an elevator and other apartment doors, as well as the interior of apartment hallway shoot off.
A new Non-practical kitchen, was put in the current dining room space, as well as doorway arches throughout the space were squared off to change the look of the apartment.
The original plan was obtained from the Toronto Art Department Website, Measurements were confirmed on site, and edited as required.

Location - Apartment
Page 2 of 5
Working at the direction of the Production Designer and Art Director; Mel was able to make this already small apartment into an ever smaller cramped space, as scripted.
The interior hallway was to be Doubled as an Exterior Apartment Corridor with an elevator and other apartment doors, as well as the interior of apartment hallway shoot off.
A new Non-practical kitchen, was put in the current dining room space, as well as doorway arches throughout the space were squared off to change the look of the apartment.
The original plan was obtained from the Toronto Art Department Website, Measurements were confirmed on site, and edited as required.

Location - Apartment
Page 3 of 5
Working at the direction of the Production Designer and Art Director; Mel was able to make this already small apartment into an ever smaller cramped space, as scripted.
The interior hallway was to be Doubled as an Exterior Apartment Corridor with an elevator and other apartment doors, as well as the interior of apartment hallway shoot off.
A new Non-practical kitchen, was put in the current dining room space, as well as doorway arches throughout the space were squared off to change the look of the apartment.
The original plan was obtained from the Toronto Art Department Website, Measurements were confirmed on site, and edited as required.

Location - Apartment
Page 4 of 5
Working at the direction of the Production Designer and Art Director; Mel was able to make this already small apartment into an ever smaller cramped space, as scripted.
The interior hallway was to be Doubled as an Exterior Apartment Corridor with an elevator and other apartment doors, as well as the interior of apartment hallway shoot off.
A new Non-practical kitchen, was put in the current dining room space, as well as doorway arches throughout the space were squared off to change the look of the apartment.
The original plan was obtained from the Toronto Art Department Website, Measurements were confirmed on site, and edited as required.

Location - Apartment
Page 5 of 5
Working at the direction of the Production Designer and Art Director; Mel was able to make this already small apartment into an ever smaller cramped space, as scripted.
The interior hallway was to be Doubled as an Exterior Apartment Corridor with an elevator and other apartment doors, as well as the interior of apartment hallway shoot off.
A new Non-practical kitchen, was put in the current dining room space, as well as doorway arches throughout the space were squared off to change the look of the apartment.
The original plan was obtained from the Toronto Art Department Website, Measurements were confirmed on site, and edited as required.
Location Build - Shanty Town
Page 1 of 3
A lot of time and research went into this project; CNC patterns were created based on historically accurate patterns in Trinidad at the turn of the 1900’s.
Screen Cap of the aired project, Concept in SketchUp on a google photo & CNC outlines.

Location Build - Shanty Town
Page 2 of 3
A lot of time and research went into this project; CNC patterns were created based on historically accurate patterns in Trinidad at the turn of the 1900’s.
Screen Cap of the aired project, Concept in SketchUp on a google photo & CNC outlines.

Location Build - Shanty Town
Page 1 of 3
A lot of time and research went into this project; CNC patterns were created based on historically accurate patterns in Trinidad at the turn of the 1900’s.
Screen Cap of the aired project, Concept in SketchUp on a google photo & CNC outlines.
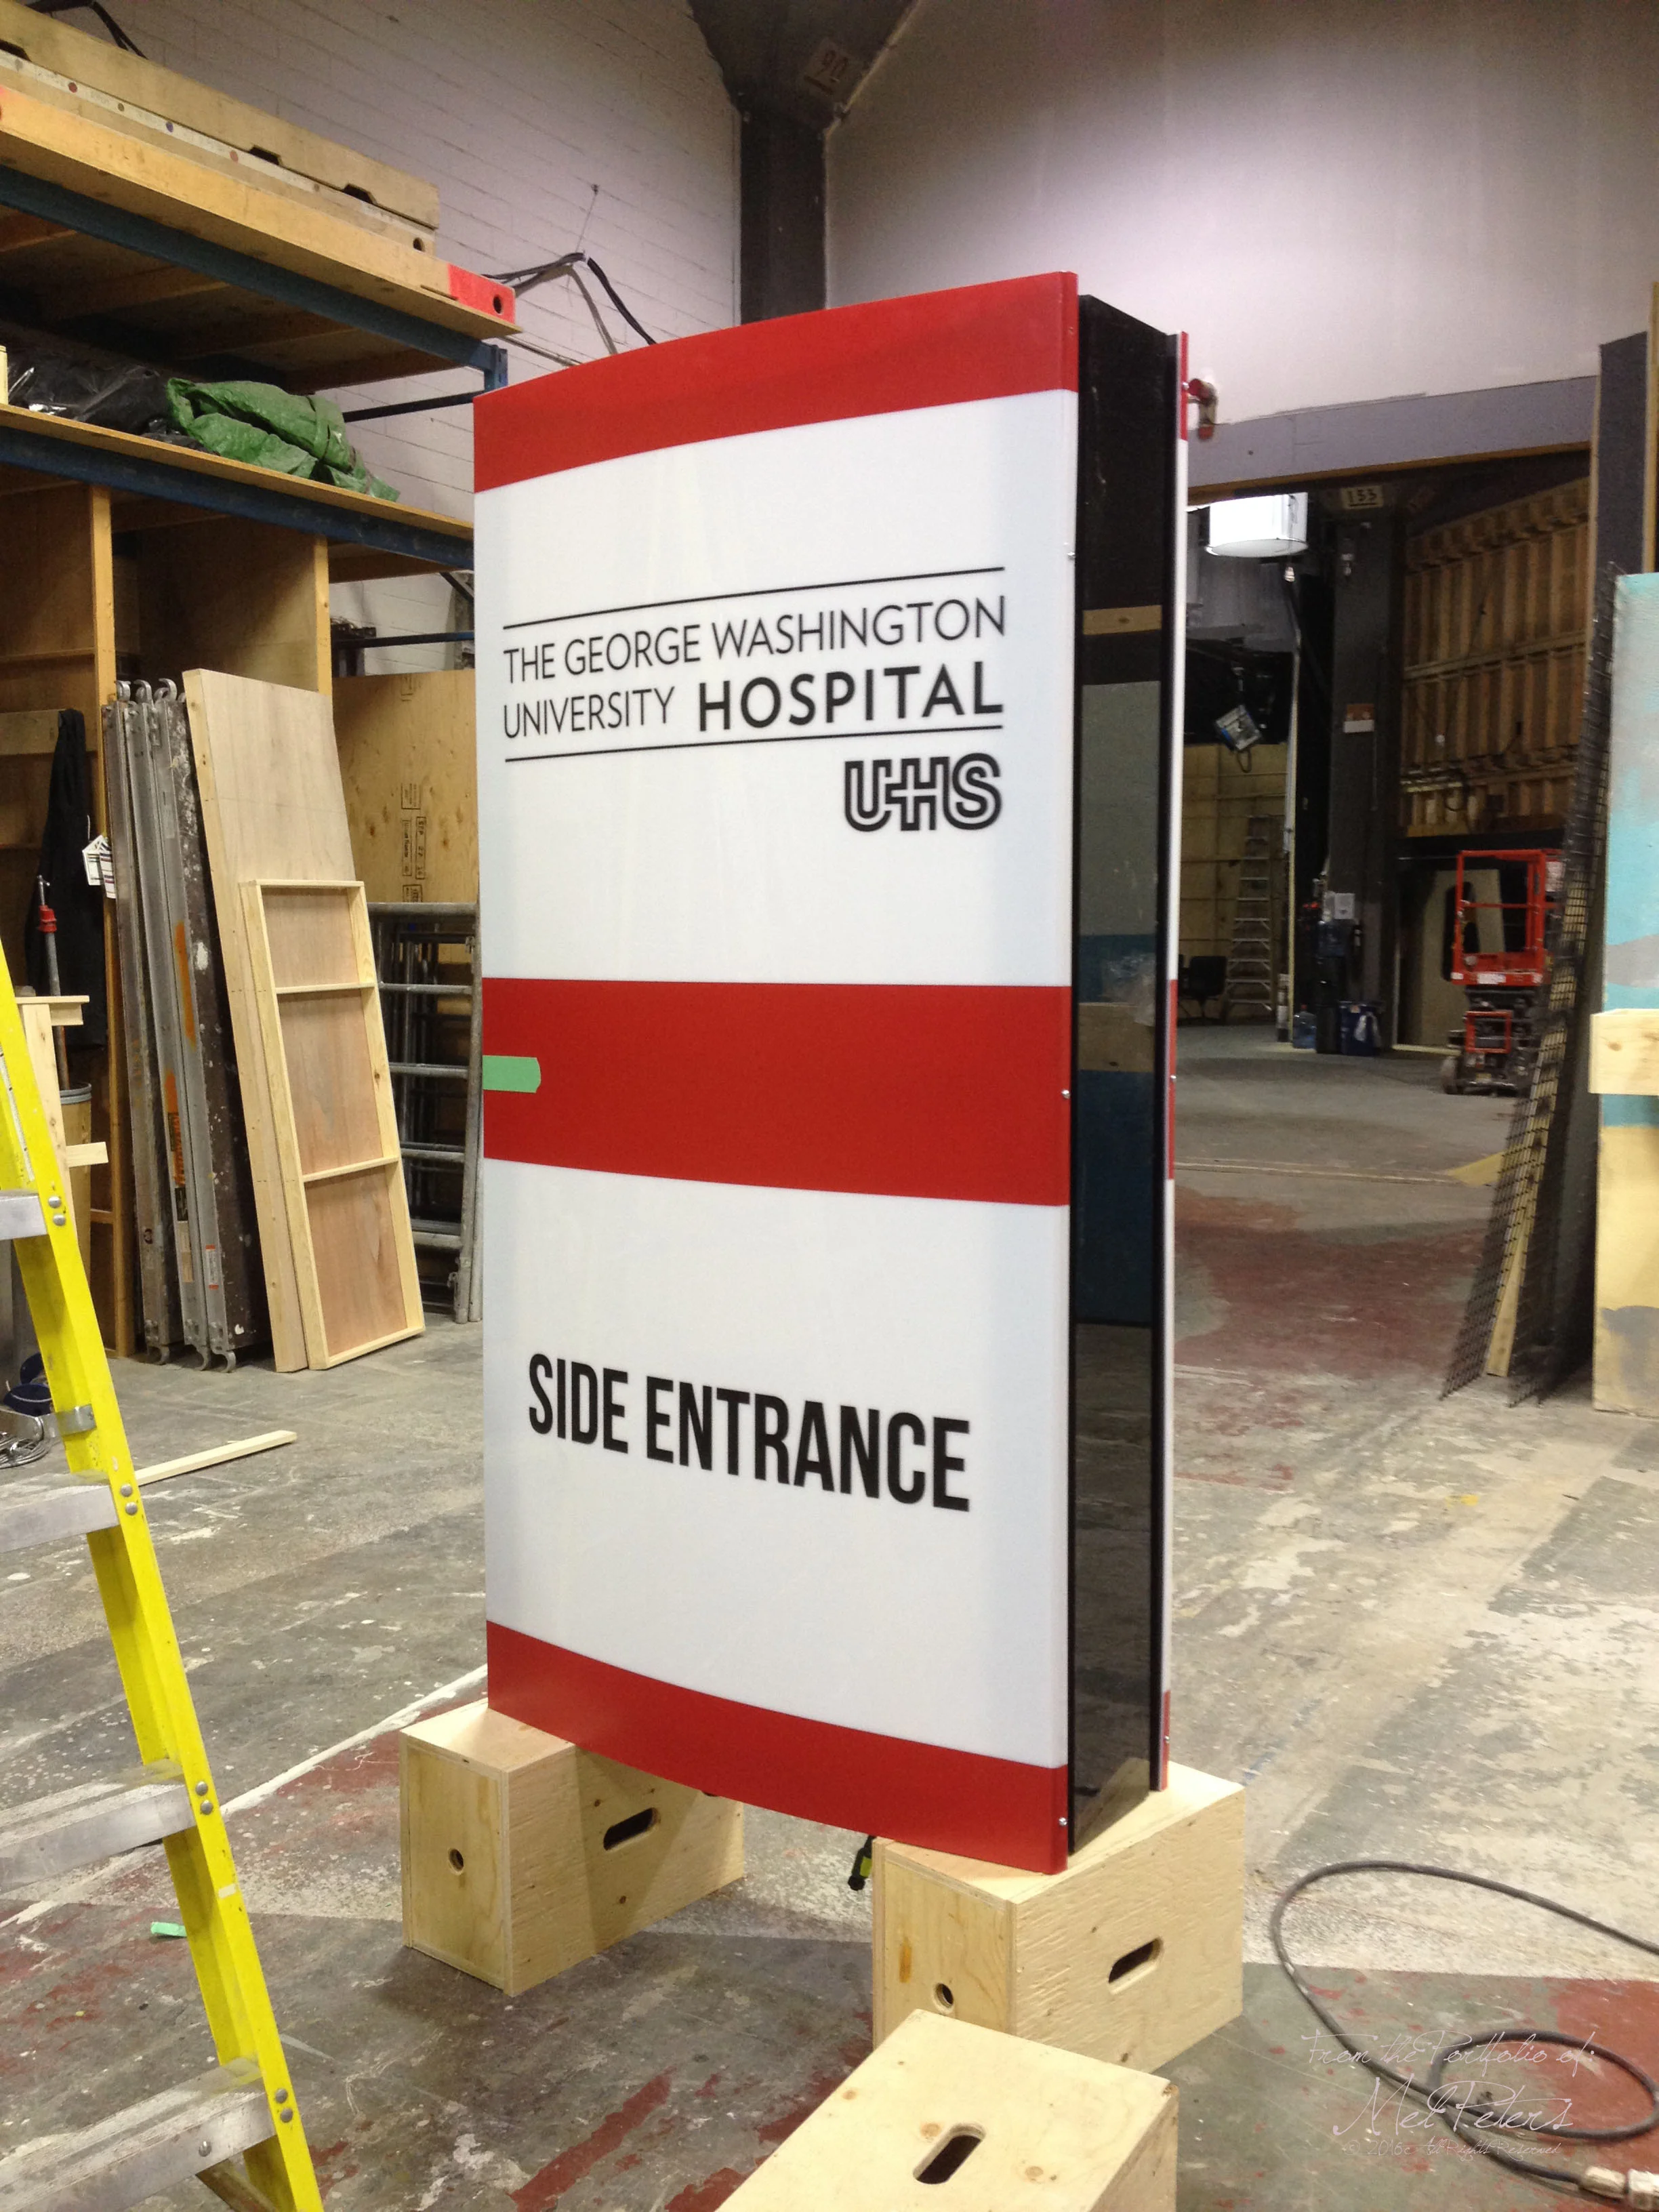
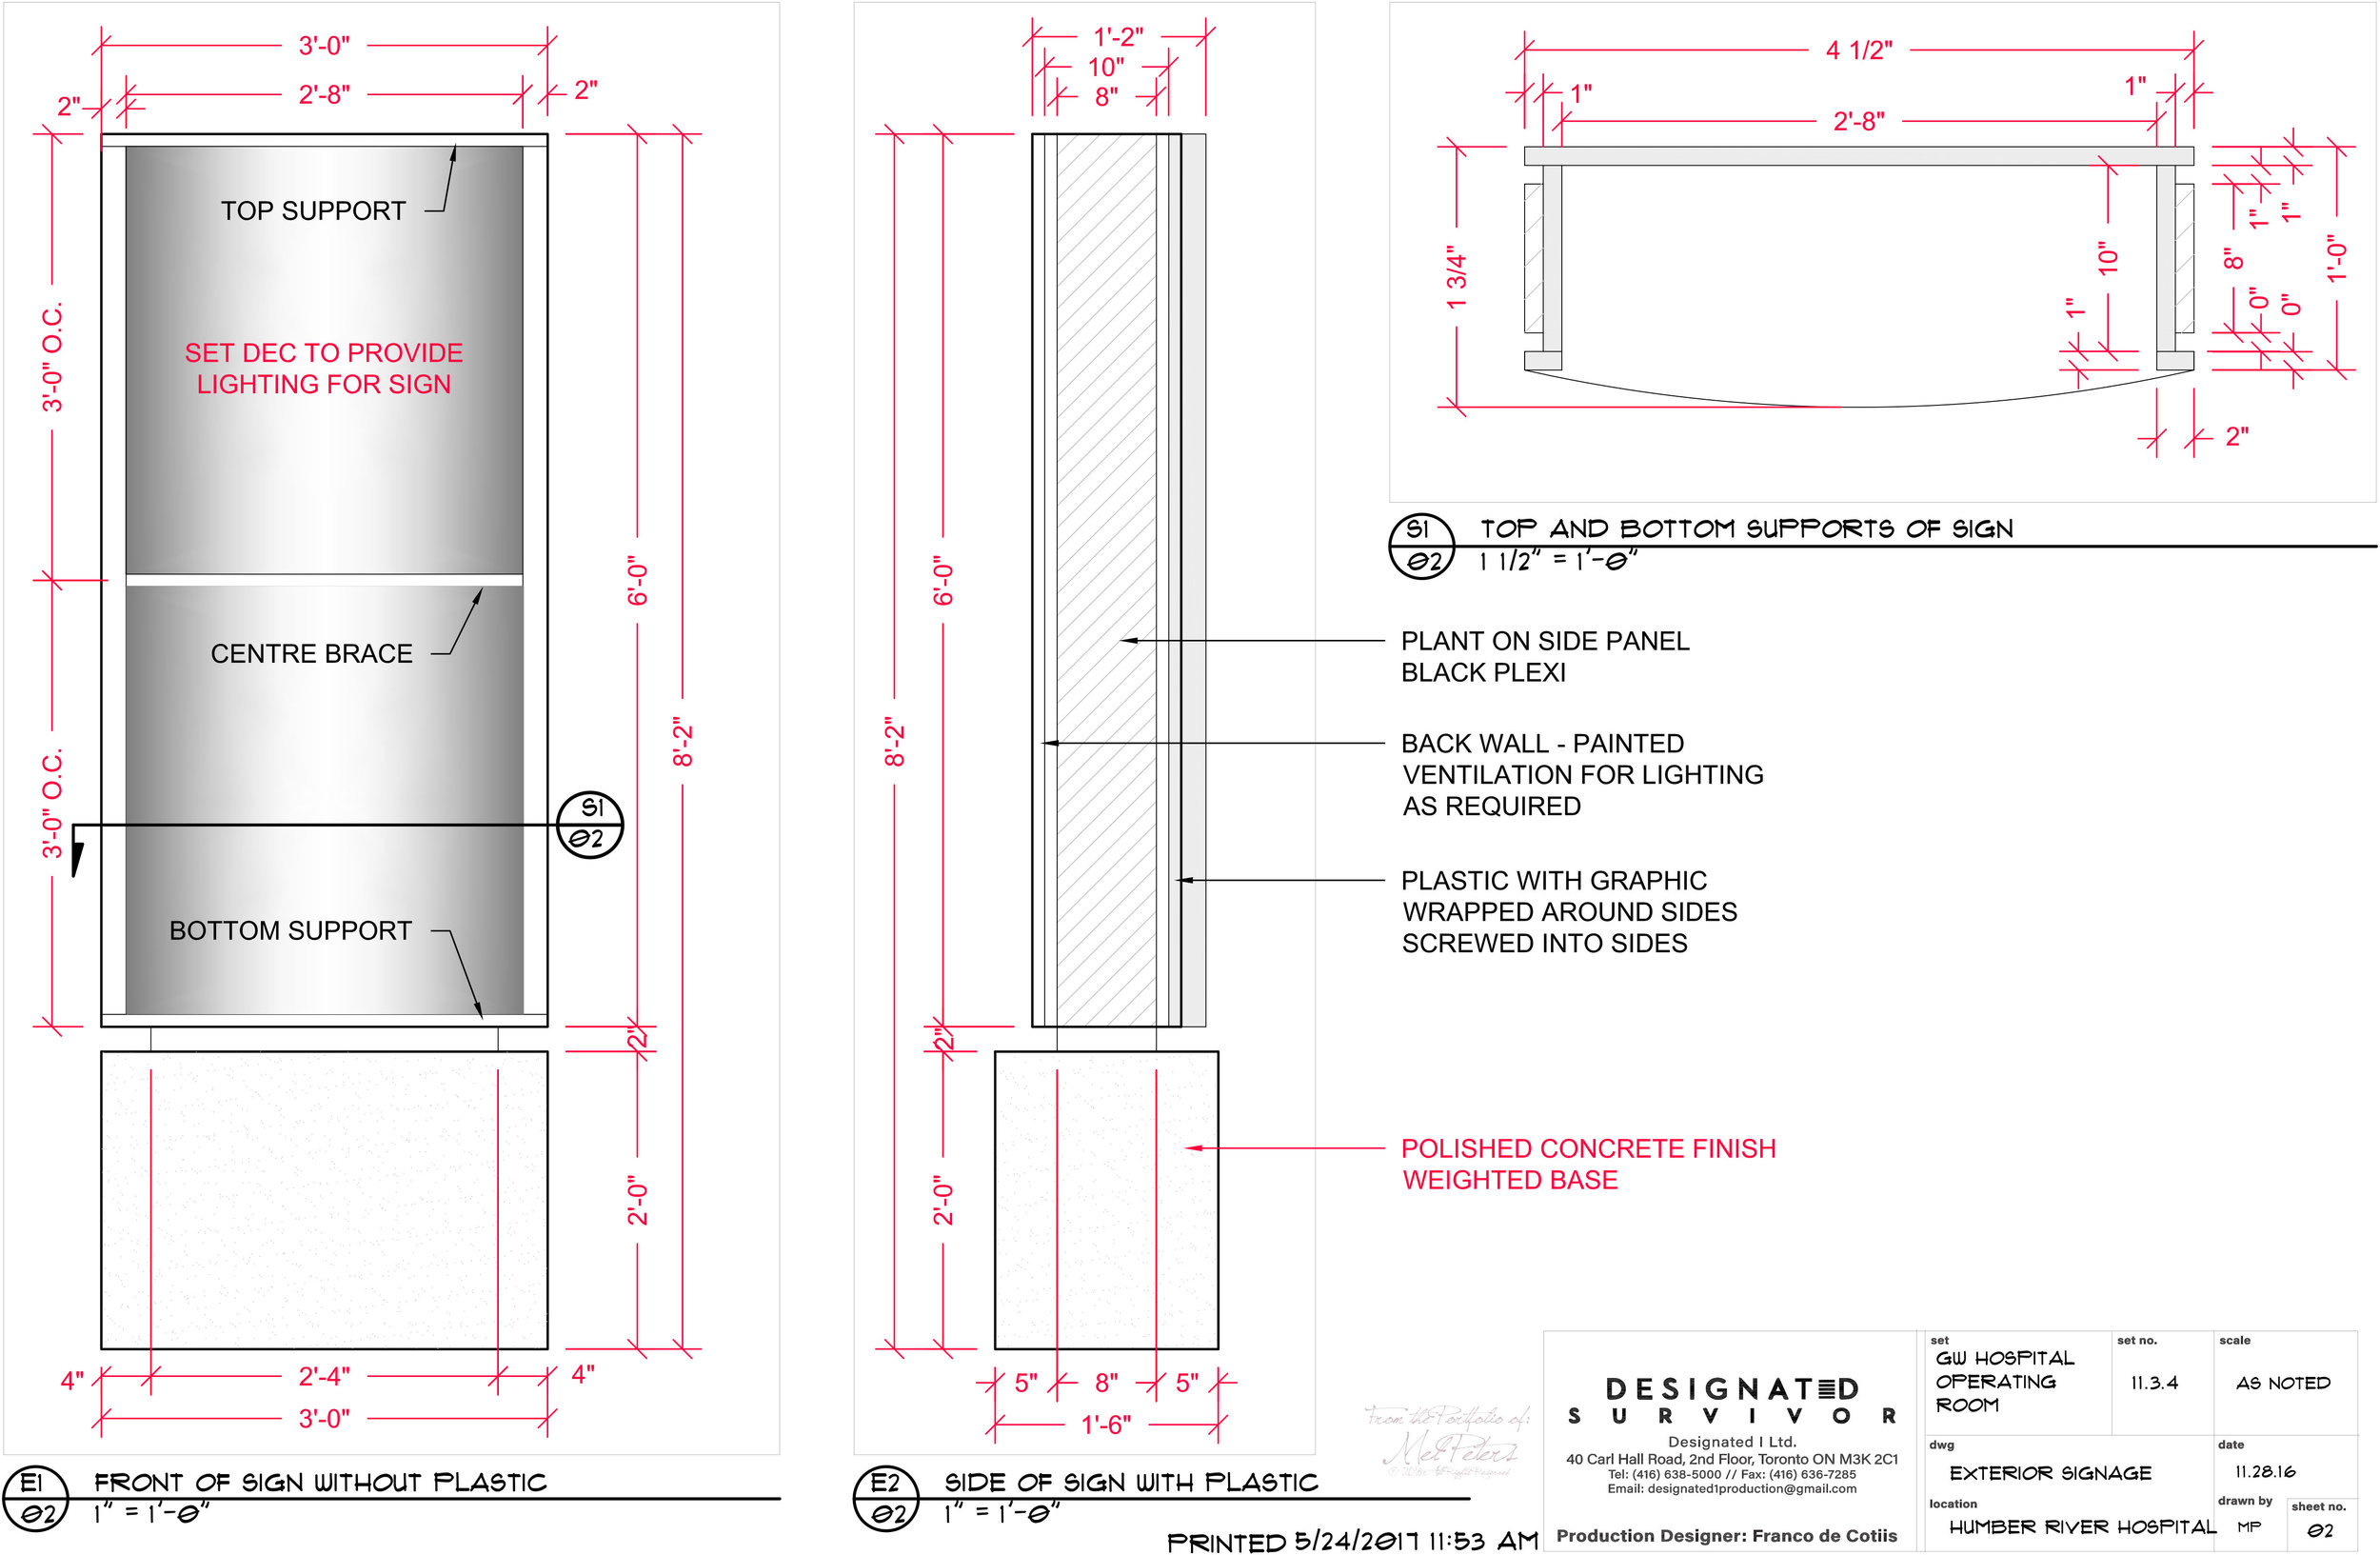
Location - Hospital Sign
Page 1 of 3
A lot of problem solving went into this piece; conceptually the piece was relatively easy however, the size of the sign, along with the Production Designer's request to have the milk plexi front with a slight curve, and wrap around the sides posed a challenge.
A sketch up model was done to get the overall size and feel of the sign, and then working drawings were created based on the concept.
The sign was to be lit from within, therefore requiring the internal structure to work with the graphics.

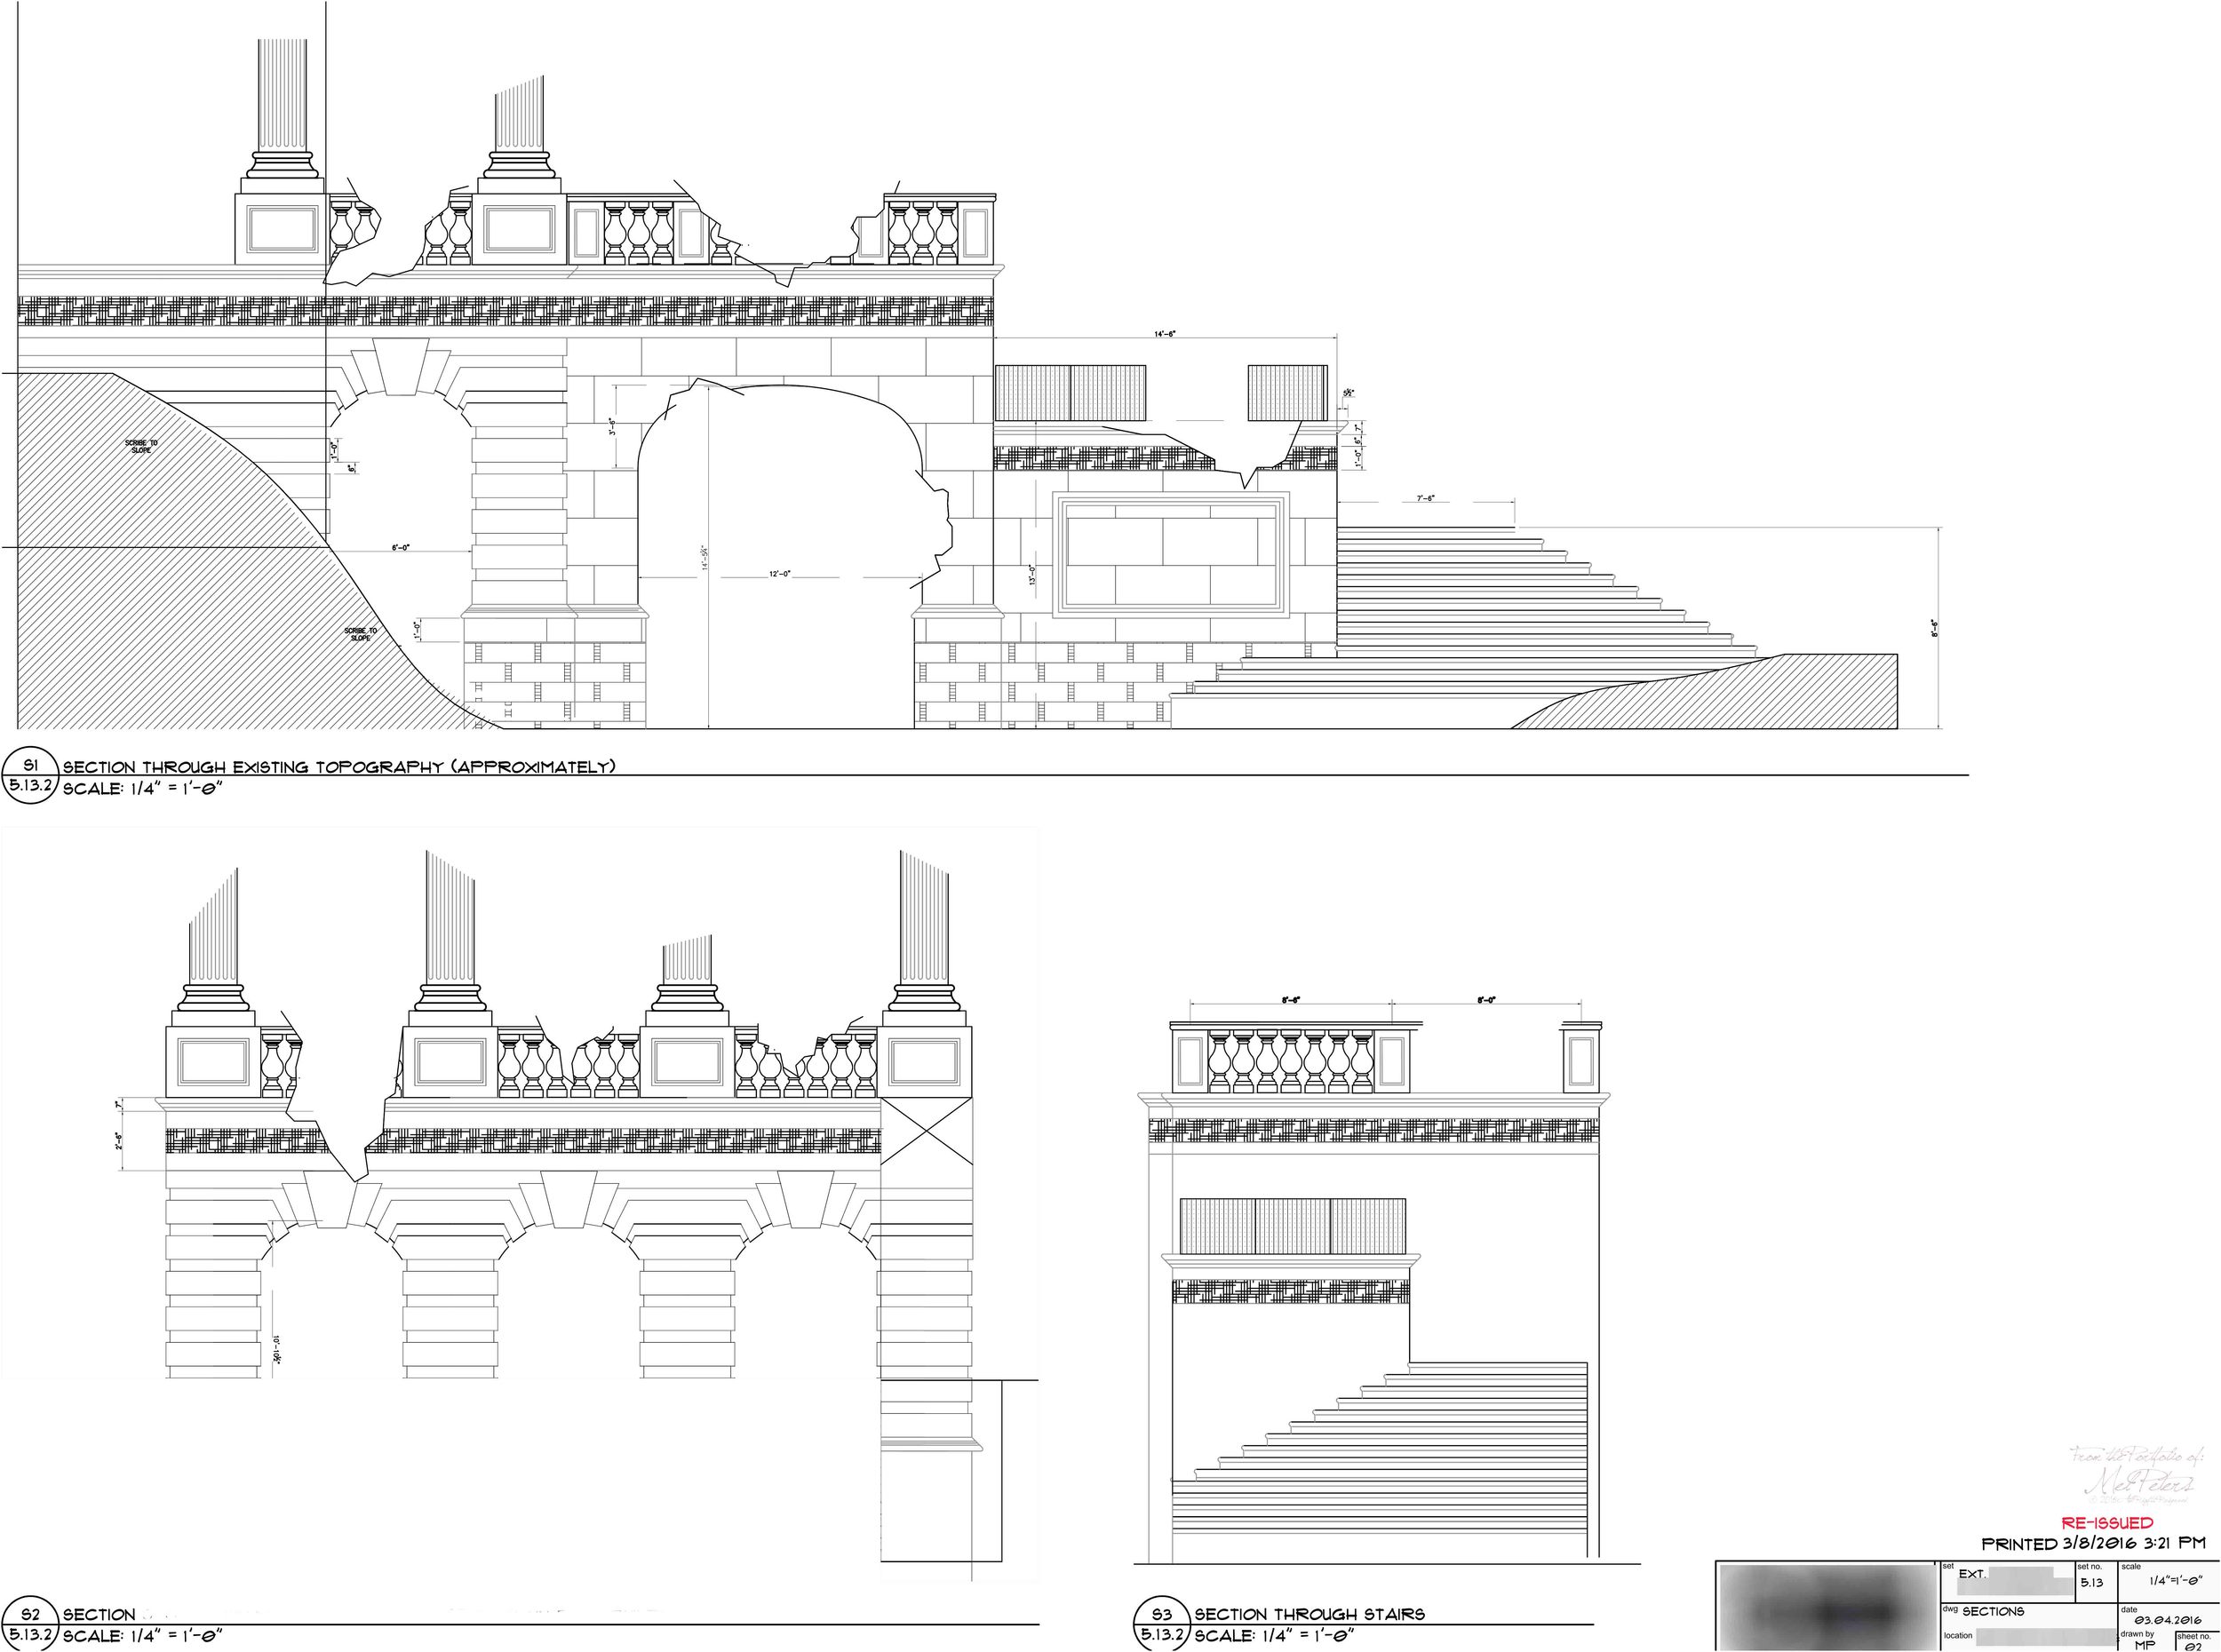
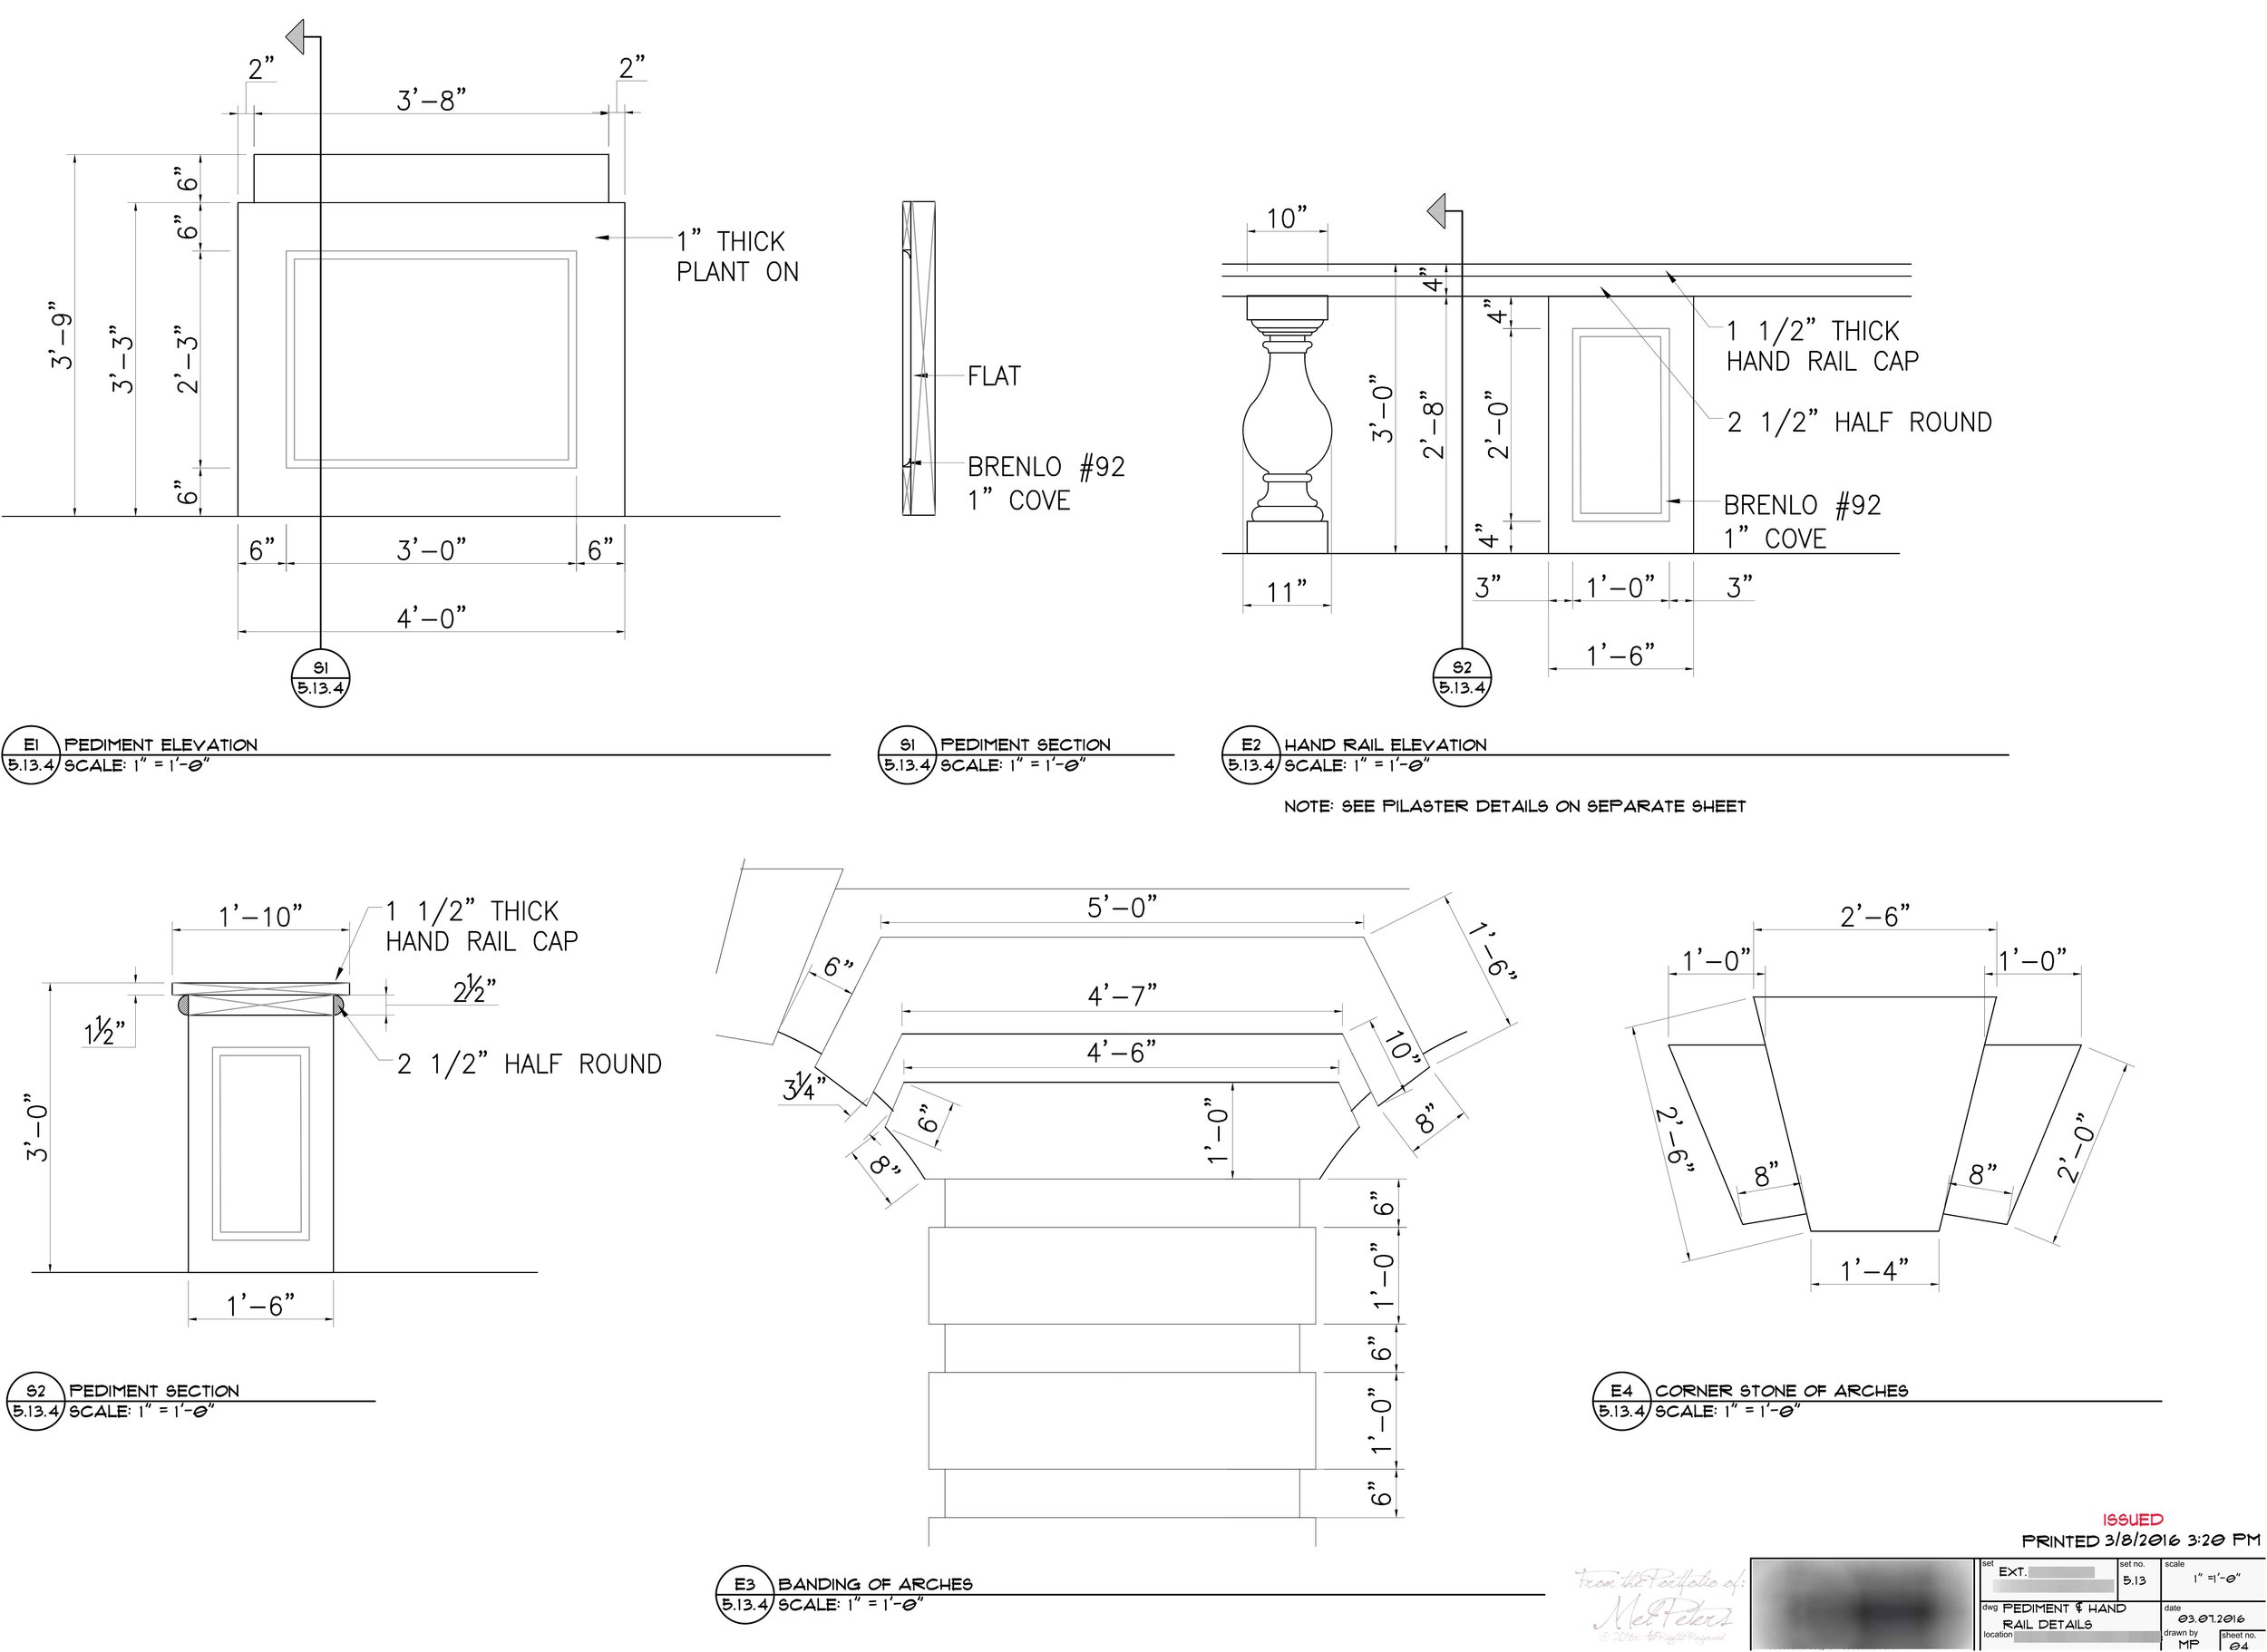
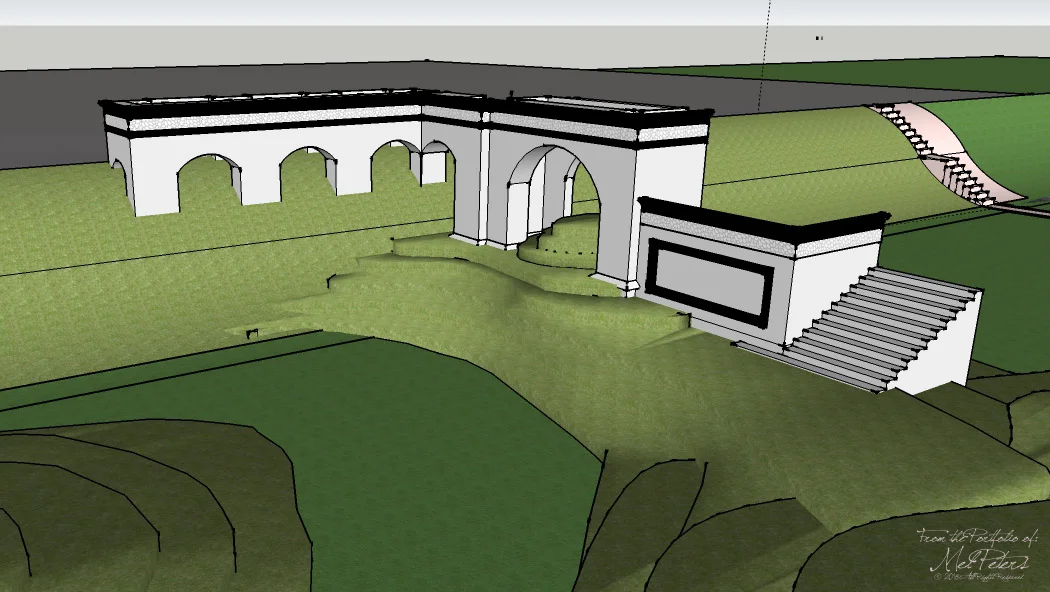
Exterior Build - Destruction Site
Pg 1 of 7
With a sketch and a couple photos provided by the Production Designer, the existing building was given to Mel to duplicate and detail out for the build.
The slope of the hill that the flats were built on made this a bit of a challenge, however discussing building practices with the Art Director and Construction Coordinator, the set quickly came together.
Engineer Drawings were also drawn up by Mel to get the Site Approved for Safety.
A Model was made, and plans were drawn for the creation of the debris piles by the Greens Department. The Building was the background of a larger scene with Emergency Vehicles, however the action all happens near the Building.
Note: Column & Pilaster Details by G. Cheung

Exterior Build - Destruction Site
Pg 2 of 7
With a sketch and a couple photos provided by the Production Designer, the existing building was given to Mel to duplicate and detail out for the build.
The slope of the hill that the flats were built on made this a bit of a challenge, however discussing building practices with the Art Director and Construction Coordinator, the set quickly came together.
Engineer Drawings were also drawn up by Mel to get the Site Approved for Safety.
A Model was made, and plans were drawn for the creation of the debris piles by the Greens Department. The Building was the background of a larger scene with Emergency Vehicles, however the action all happens near the Building.
Note: Column & Pilaster Details by G. Cheung

Exterior Build - Destruction Site
Pg 3 of 7
With a sketch and a couple photos provided by the Production Designer, the existing building was given to Mel to duplicate and detail out for the build.
The slope of the hill that the flats were built on made this a bit of a challenge, however discussing building practices with the Art Director and Construction Coordinator, the set quickly came together.
Engineer Drawings were also drawn up by Mel to get the Site Approved for Safety.
A Model was made, and plans were drawn for the creation of the debris piles by the Greens Department. The Building was the background of a larger scene with Emergency Vehicles, however the action all happens near the Building.
Note: Column & Pilaster Details by G. Cheung
Exterior Build - Destruction Site
Pg 4 of 7
With a sketch and a couple photos provided by the Production Designer, the existing building was given to Mel to duplicate and detail out for the build.
The slope of the hill that the flats were built on made this a bit of a challenge, however discussing building practices with the Art Director and Construction Coordinator, the set quickly came together.
Engineer Drawings were also drawn up by Mel to get the Site Approved for Safety.
A Model was made, and plans were drawn for the creation of the debris piles by the Greens Department. The Building was the background of a larger scene with Emergency Vehicles, however the action all happens near the Building.
Note: Column & Pilaster Details by G. Cheung

Exterior Build - Destruction Site
Pg 5 of 7
With a sketch and a couple photos provided by the Production Designer, the existing building was given to Mel to duplicate and detail out for the build.
The slope of the hill that the flats were built on made this a bit of a challenge, however discussing building practices with the Art Director and Construction Coordinator, the set quickly came together.
Engineer Drawings were also drawn up by Mel to get the Site Approved for Safety.
A Model was made, and plans were drawn for the creation of the debris piles by the Greens Department. The Building was the background of a larger scene with Emergency Vehicles, however the action all happens near the Building.
Note: Column & Pilaster Details by G. Cheung
Exterior Build - Destruction Site
Pg 6 of 7
With a sketch and a couple photos provided by the Production Designer, the existing building was given to Mel to duplicate and detail out for the build.
The slope of the hill that the flats were built on made this a bit of a challenge, however discussing building practices with the Art Director and Construction Coordinator, the set quickly came together.
Engineer Drawings were also drawn up by Mel to get the Site Approved for Safety.
A Model was made, and plans were drawn for the creation of the debris piles by the Greens Department. The Building was the background of a larger scene with Emergency Vehicles, however the action all happens near the Building.
Note: Column & Pilaster Details by G. Cheung
Exterior Build - Destruction Site
Pg 7 of 7
With a sketch and a couple photos provided by the Production Designer, the existing building was given to Mel to duplicate and detail out for the build.
The slope of the hill that the flats were built on made this a bit of a challenge, however discussing building practices with the Art Director and Construction Coordinator, the set quickly came together.
Engineer Drawings were also drawn up by Mel to get the Site Approved for Safety.
A Model was made, and plans were drawn for the creation of the debris piles by the Greens Department. The Building was the background of a larger scene with Emergency Vehicles, however the action all happens near the Building.
Note: Column & Pilaster Details by G. Cheung
Photos of model, finished set, as well as missing title block details available in portfolio; and will be added to online portfolio once set has aired.

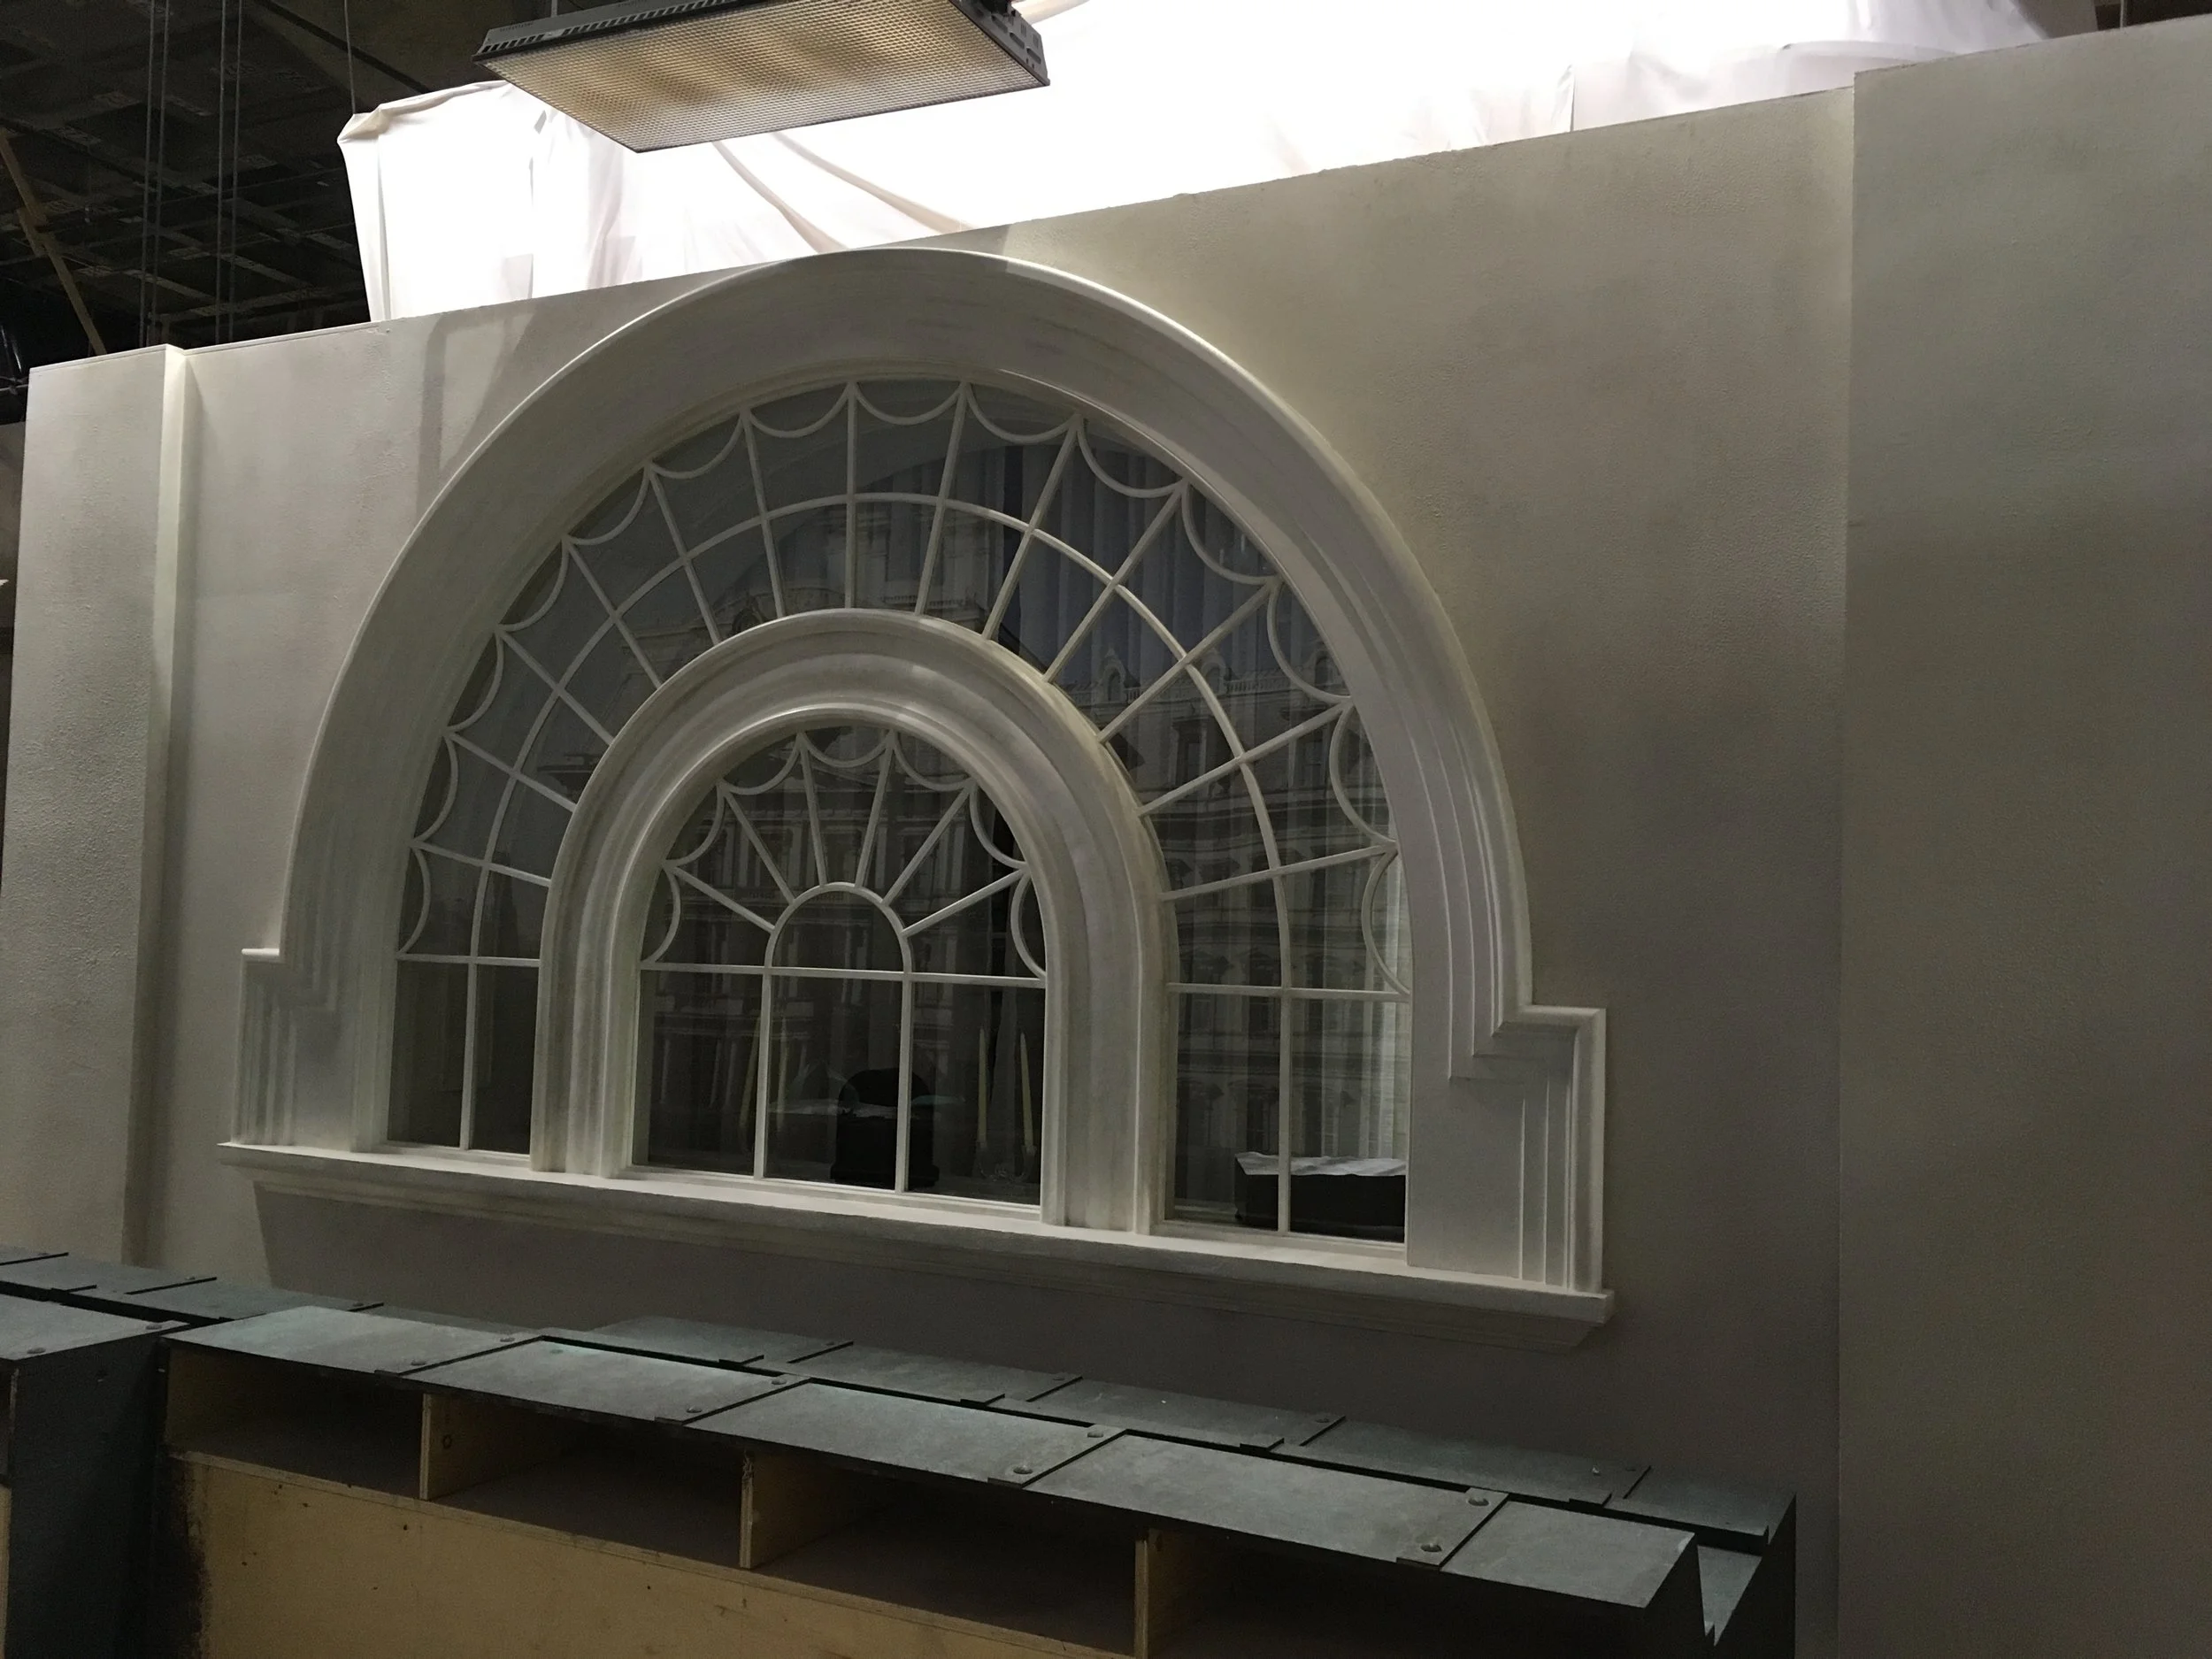
White House Exterior Window
Page 1 of 3
An existing window had to be faced on the exterior for a shot; a lot of research had to be done, since good quality photos of this window are hard to find; based on the Designer's vision this window was detailed and built.

White House Exterior Window
Page 1 of 3
An existing window had to be faced on the exterior for a shot; a lot of research had to be done, since good quality photos of this window are hard to find; based on the Designer's vision this window was detailed and built.
White House Exterior Window
Page 3 of 3
An existing window had to be faced on the exterior for a shot; a lot of research had to be done, since good quality photos of this window are hard to find; based on the Designer's vision this window was detailed and built.

Props - Bomb Crate
Early Network Drafts called for a container to house some already established Missiles; Working with reference photos, and the Designer's input these boxes were designed, but never built.

Location - Hospital
Page 1 of 4
A quick drawing was done to give to Carps/Paint/Set Dec where there was a few small details to put into small spaces.

Location - Hospital
Page 2 of 4
A quick drawing was done to give to Carps/Paint/Set Dec where there was a few small details to put into small spaces.

Location - Hospital
Page 1 of 4
A quick drawing was done to give to Carps/Paint/Set Dec where there was a few small details to put into small spaces.

Location - Hospital
Page 1 of 4
A quick drawing was done to give to Carps/Paint/Set Dec where there was a few small details to put into small spaces.
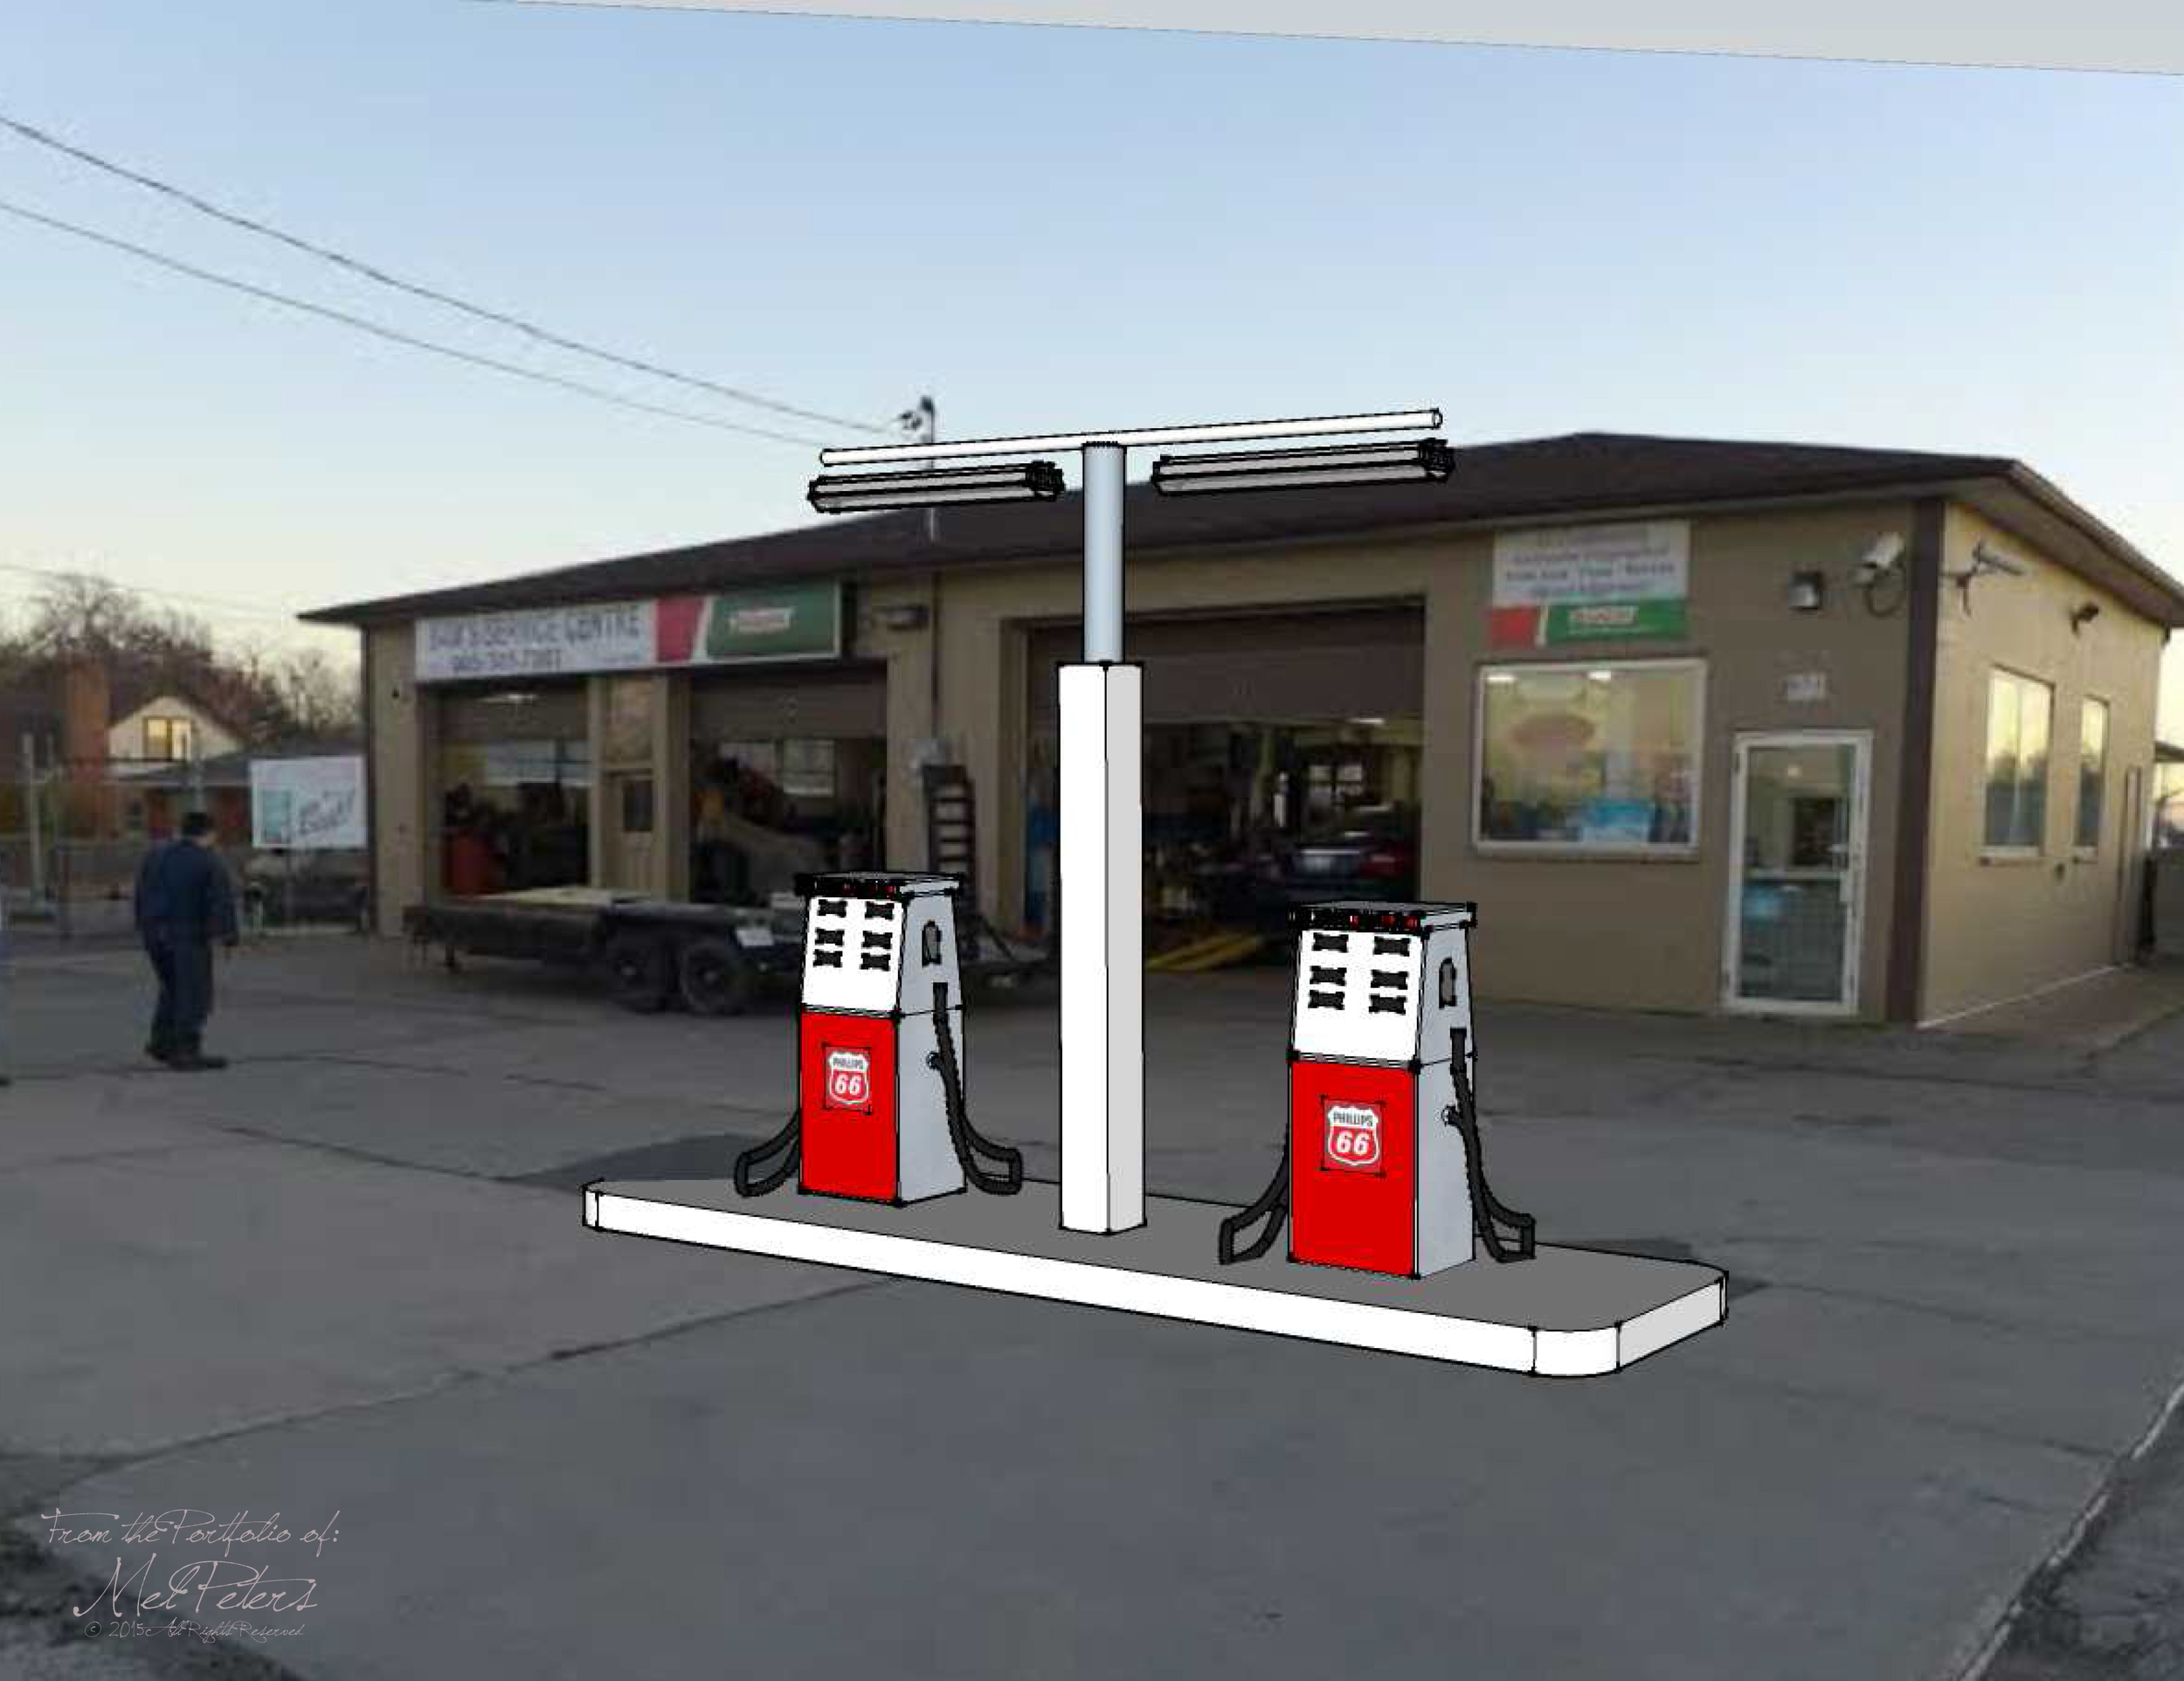
Gas Pumps - Shoot the Messenger
The existing design was handed to Mel to create a SketchUp model of the gas pumps and "concrete" pad that were to be built for a location.
To create a more realistic concept to present to the Director, a site photo was added into the background.
Photo Courtesy of James Oswald
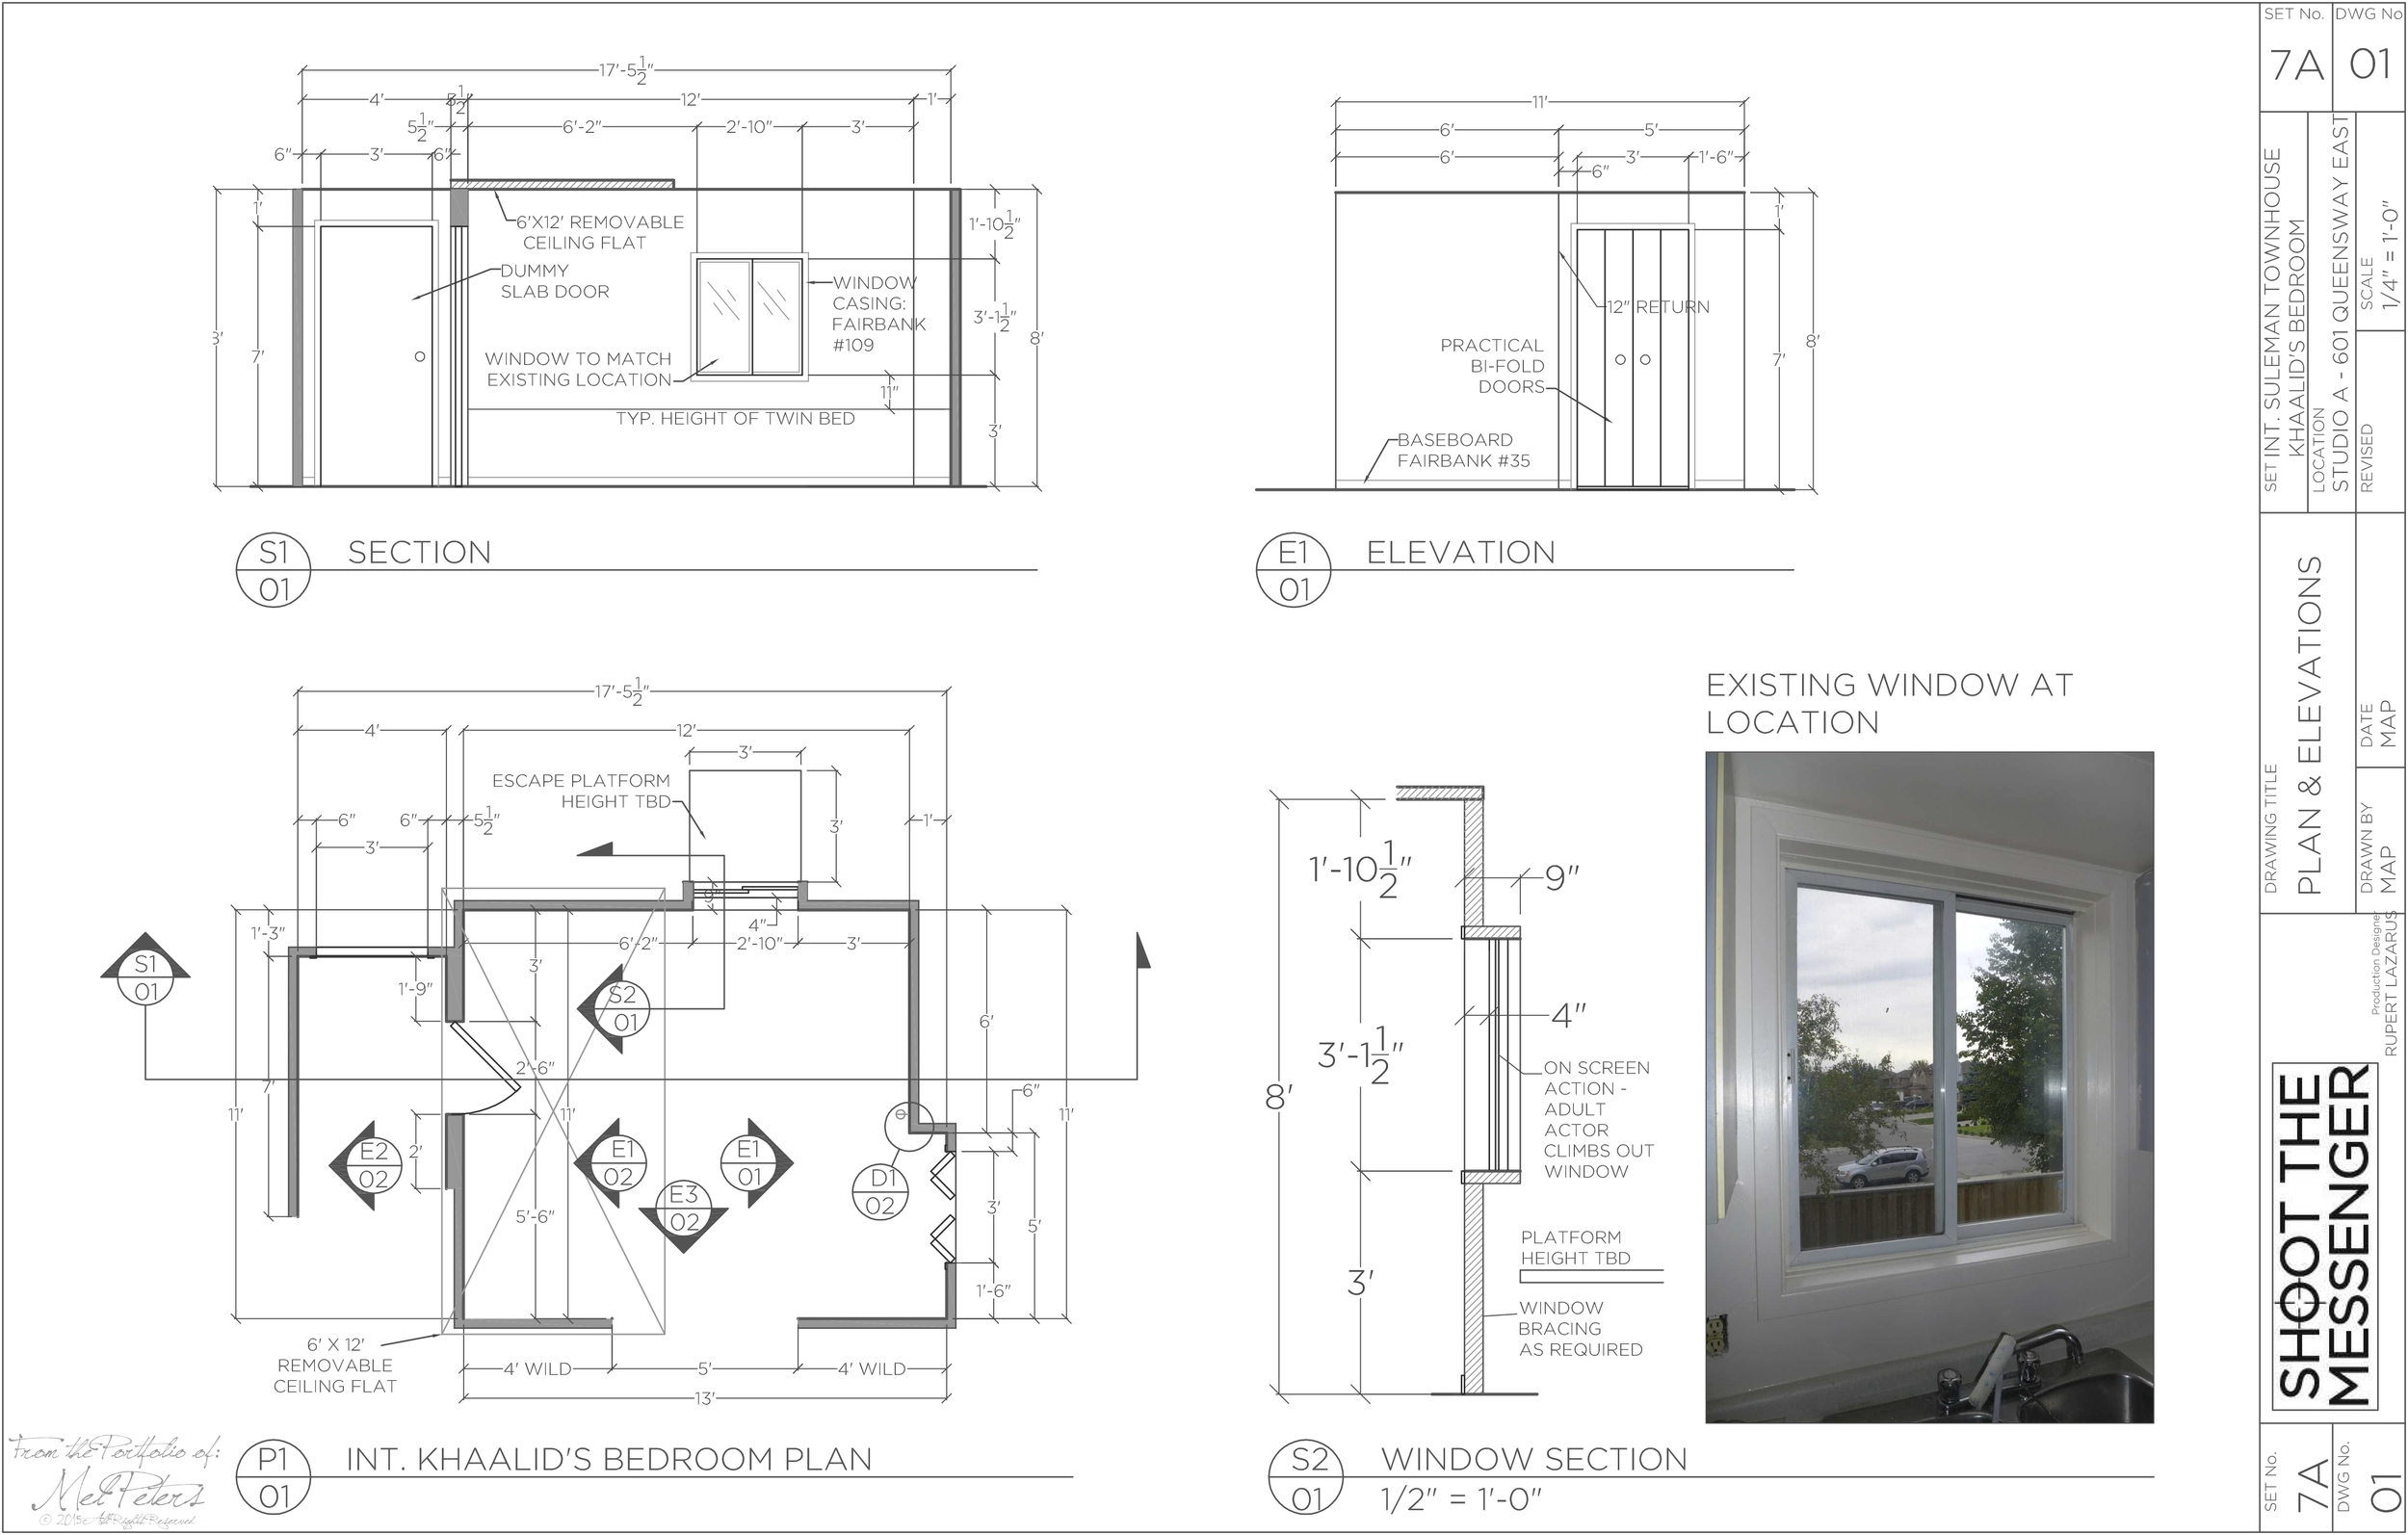
Studio Set - Shoot the Messenger
Page 1 of 2
A studio set was required to match an exterior of a location. A rough concept from Production Designer was handed to Mel to draw up construction drawings, and detail out how the fake electrical outlet, which was a scripted element.

Studio Set - Shoot the Messenger
Page 2 of 2
A studio set was required to match an exterior of a location. A rough concept from Production Designer was handed to Mel to draw up construction drawings, and detail out how the fake electrical outlet, which was a scripted element.
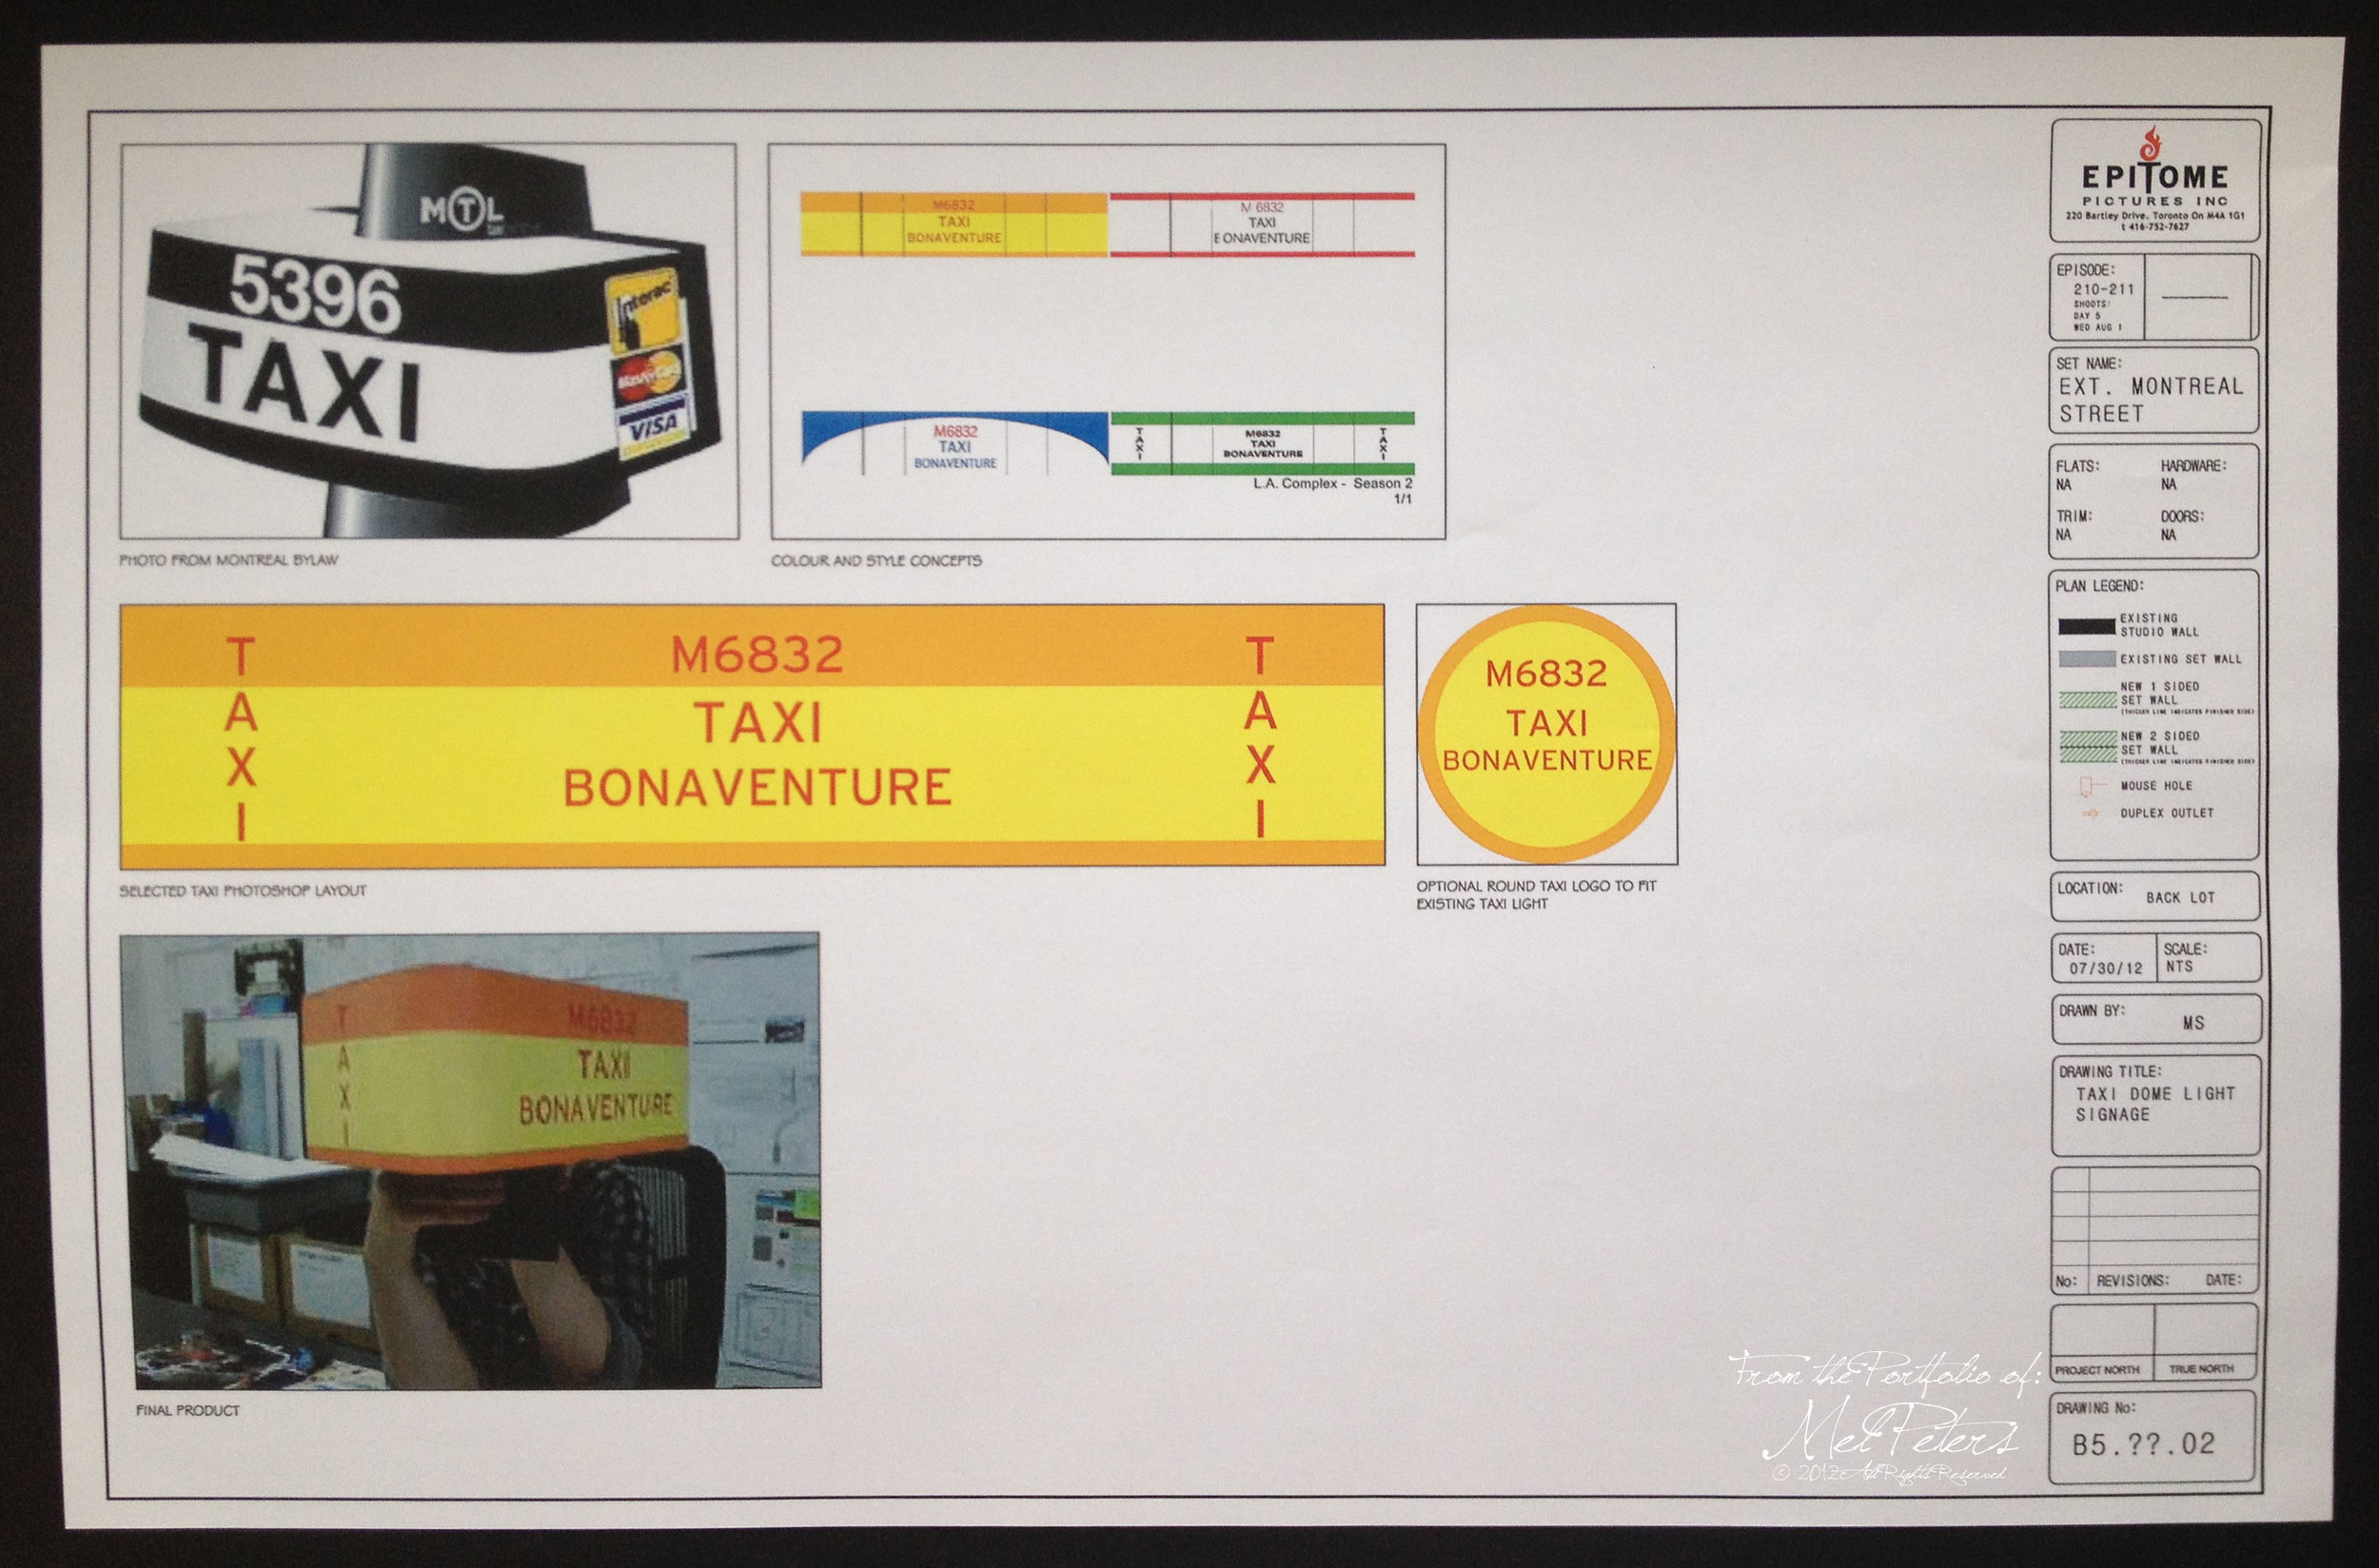
Taxi Light - The LA Complex
2 of 2
After doing research on the current Montreal Taxi lights, (One of the Characters is originally from there) it was decided that Mel would simplify the design, and draw up the plans for construction to build the roof light for the taxi.
Cad & SketchUp (Pre-2019)